Quickstart
Start by following the steps described in the installation guide; this will get docker and docker-compose installed, download the required docker containers, and attempt to launch them.
Once all docker containers are up and running correctly, you should have something similar to the following architecture:
 Figure 1.: docker containers and dependencies.
 Figure 2.: docker containers architecture and flow of use from clients through A2 to storage back-ends and analysis modules.
Notice that after installation, a .env file is generated inside the rage-analytics folder containing a random root user and password (if you cannot find the file, it may be hidden by default).
Check out the Sign up page of the Analytics Front-end: its default route is http://localhost:3000/api/proxy/afront/signup. A2 can be found at http://localhost:3000; all other RAGE Analytics services should be accessed using this prefix. At the sign-up page you may create one account for a developer, a teacher and a student, selecting the type of account by choosing the corresponding icon.

Figure 3.: front-end sign-up page. Access to this page should only be available to properly authorized users in production environments
Roles are defined as follows:
- A
developercreates and registers games. The developer programs the game to send information on user interactions, via xAPI statements (using the tracker to simplify and automate the process). Developers also configure the real-time analytics that will be performed on incoming statements, and can configure the game with the tracking code provided when a new game is created, setting up the correct game host-link and creating an analysis model for the real-time dashboard. - A
teachercreates, starts and closes classes (which group game-play sessions for a particular version of the game, and a particular set of student players, during a limited time-period) for a game and manages the players that can join that class in order to see their data in real time. - A
studentplays the game and gets tracked.
-
Create a game (see Figure 4) and make it public for teachers to see it, otherwise only you as a developer will be able to see the game (see Figure 5).
-
Set up the provided Tracking code, the game link and
collectorHostvalues. -
Define a real-time analysis model.
-
Define an analysis model.
-
Add a game link where the students can play the game (this link will appear in the students view)
-
Wait for the people to play the game in order to see the default set of visualizations for developers.

Figure 4.: developers can add a new game from the front-end.
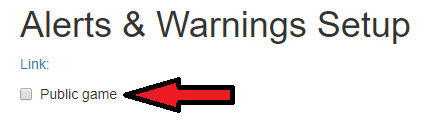
Figure 5.: developers need to make games public for teachers to be able to see them.
-
Create a class for a game (see Figure 6).
-
Wait for the students to play the game in order to see the real-time dashboards.

Figure 6.: teachers can set-up a new class from the front-end.
- Play the game, available when you log in or, without log in, with the game provided by teachers (in this case, teachers will need to allow anonymous users to track data from).
If you want to know how to manage users, roles and applications by the A2 interface you can see the administration view.