Installation and development
What is the ST-LIB? is a utility library for the STM32H7ZGT6 microcontroller that makes it simple and easy to use. It is composed of several parts, some low level and others high level. These parts are the HALAL (Hardware Abstraction Layer Abstraction Layer), the ST-LIB LOW and the ST-LIB itself.
The HALAL is a layer above the official ST HAL to make it easier to use. It is also responsible for starting all the micro peripherals and other configurations.
The ST-LIB LOW is a layer above HALAL that uses the services it implements to create, for example, sensors, actuators, etc. In this way we abstract the intrinsic complexities of these peripherals so that they can be used in a simple way.
The ST-LIB itself is a layer above the ST-LIB LOW. The ST-LIB uses the classes implemented by the previous layer to create the boards as a whole, integrating all the peripherals.
As you can see, it is a complex project with several layers, some dependent on the hardware itself and others totally independent of it. So you will need to set up various tools and learn a few things before you can start developing. Most of these will be listed and briefly explained below.
The operating system is the basis of every computer, our main tool. Although it is not mandatory to have any specific operating system, it is recommended to use a Linux-based system, specifically a stable Ubuntu distribution.
This operating system, apart from being faster and optimal for code development in general, comes with several pre-installed tools and is better suited to our needs.
If you are already a linux user or prefer to continue using windows for now you can skip this step.
If you are a Windows user, it is best to install Ubuntu in dual boot with Windows. This is a really simple process for which you do not need to know anything beforehand.
To install Ubuntu you can download the ISO from the following link link. It is strongly recommended to download a stable version with long-term support labeled on the page with the acronym LTS.
Once the operating system image has been downloaded, you will need to flash a usb with enough space with a program like Balena Etcher that you can download from the following link available for both windows and for linux. Keep in mind that the usb will be formatted when uploading the operating system image.
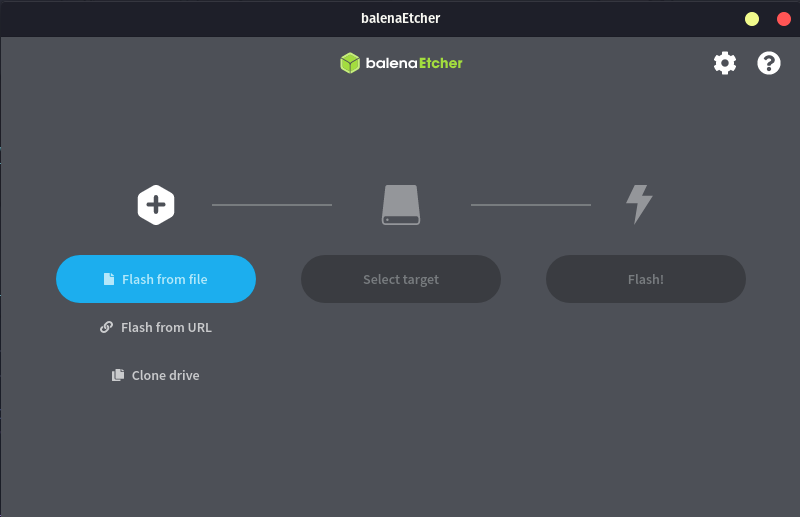
The program has a really simple interface, we just have to follow the steps. We select the operating system image that we just downloaded. Next we will carefully choose the usb in which we want to flash the image. We will press start and wait for it to finish and that's it.
Once everything is ready, you must follow the following steps:
- Turn off your computer
- Connect the USB to the computer
- Turn on your computer by simultaneously holding the key to choose boot medium, normally F10 although it depends on each computer. Common keys are ESC, F2, F10, F11, F12.
- We will select the option in which Ubuntu appears.
- Once inside ubuntu we will fill in all the information that it asks for.
- When you get to the disk partitions, everything will automatically come out preconfigured to be installed in dual boot.
- Finish the installation
- Turn off the computer
- Disconnect the USB
- Ready you already have Ubuntu installed in parallel to Windows. Now every time you turn on the computer you can choose which operating system you want (this can be configured).
If you have a problem in any step of the process, any member of the firmware team will be happy to help you, do not hesitate to ask.
It is time to get down to work with the necessary tools. In order to start developing first you must install the necessary tools. The tools you need are the following:
- Git
- STM32CubeIDE
- STM32CubeProgrammer
- Visual Studio
- Github
- Trello
You are probably already acquainted with some of these. The following points will briefly explain how to install them. Learning how to use them will be on your hands. Do your best!
As a version control tool we use git. This tool is widely used and you probably already know how it works. If this is not the case, it is recommended to learn the basic operation through a tutorial.
Git can be downloaded through the following link.
As the main code development IDE at a lower level, such as HALAL, we use STM32CubeIDE, which is the official IDE provided by ST to facilitate the programming of its microcontrollers.
We use the following version:
Version: 1.10.1
Build: 12716_20220707_0928 (UTC)
It is important to have the same version to avoid compatibility problems. If it were updated to a later version, all developers would be notified.
We can download this tool from the next link. Once we are on the page we will choose the indicated version. The page will ask you to enter your email and will send you the download link to it.
STM32CubeProgrammer is a very useful tool that allows us to program the microcontrolers without having to use the STM32CubeIDE and allows us to observe and manipulate the microcontroller's memory.
Can be downloaded from the next link. The steps to follow are the same as in the previous tool.
Visual Studio is the IDE we use for the development of the higher level code of the library. This tool is widely known and relatively easy to use.
Can be downloaded from the next link. If you are a UPV student, you can use the Microsoft account provided by the university to obtain the professional version, although the free version is more than enough.
As online repository for git we use github. If you are reading this you don't need more information ;).
Trello is an online tool, which can be downloaded as an application, which allows us to keep track of the tasks that are being carried out.
You can access through the following link. Once inside the page you just have to register and request access to the team trello.
Before starting to develop, it is important that you know what our methodology is when using git and github. There are three important aspects of using our repository. The first and most important is our organization of the branches and operation of the pull requests, other important aspects are the issues and the wiki of the repo. These three aspects will be explained below.
We follow a relatively standard gitflow. The main branch represents the current stable release, from this branch the development branch, which represents the current stable development version, is divided into two more branches (at least for now) which are HALAL and STLIB_LOW. These two branches represent the current state of development.
These are the main branches of the repository. These branches are protected and can only be merged through pull request and these must be accepted by at least two developers other than the one that has developed the code to be merged. In this way we make sure that the code to be uploaded is high quality code.
All new features that you want to implement must start from either the HALAL branch or the STLIB_LOW branch. The branches should represent specific characteristics and be small or medium in size. If a task is complex and requires a lot of code, it should be divided into several branches. These branches must follow the following naming convention: features/<feture-name> for example features/Flash.
gitGraph
        checkout main
        commit id: "1 Initial commit"
        commit id: "2 New branch"
        branch development
        commit id: "3 New branch"

        branch HALAL
        commit id: "4 New branch"

        checkout HALAL
        branch features/Flash
        checkout features/Flash
        commit id: "6 Read flash finished"
        commit id: "8 Write and tests"

        checkout HALAL
        merge features/Flash
        checkout development
        merge HALAL
        checkout main
        merge development
Once we finish developing the feature in the corresponding branch we must make a pull request to be able to upload this code to the corresponding main branch, for example if you were doing the flash memory service as in the previous example you would make a pull request that does the next merge features/Flash -> HALAL.
Pull requests must follow a standard structure to facilitate their interpretation. They may contain the following points:
- Explanation of the feature
- Examples of use
- Tests that have passed
- Notes and/or warnings
At least a pull request must contain points 1 and 3. Depending on the complexity of the feature it will be highly recommended to add usage examples. As an example of a minimum pull request (explanation and tests) it can be seen in the following link (the documentation and error handler section in this pull request would count as part of the explanation).
There are two types of pull requests, normal pull requests and draft pull requests. The first ones, as soon as they are published, they will be pending to be reviewed and approved. The second ones are interesting because they are useful for when the branch is still under development or has yet to pass the tests but you want other developers to be able to review it to receive feedback without it being accepted until you indicate it. The type of pull request can be chosen by clicking on the arrow next to the option to create the pull request.
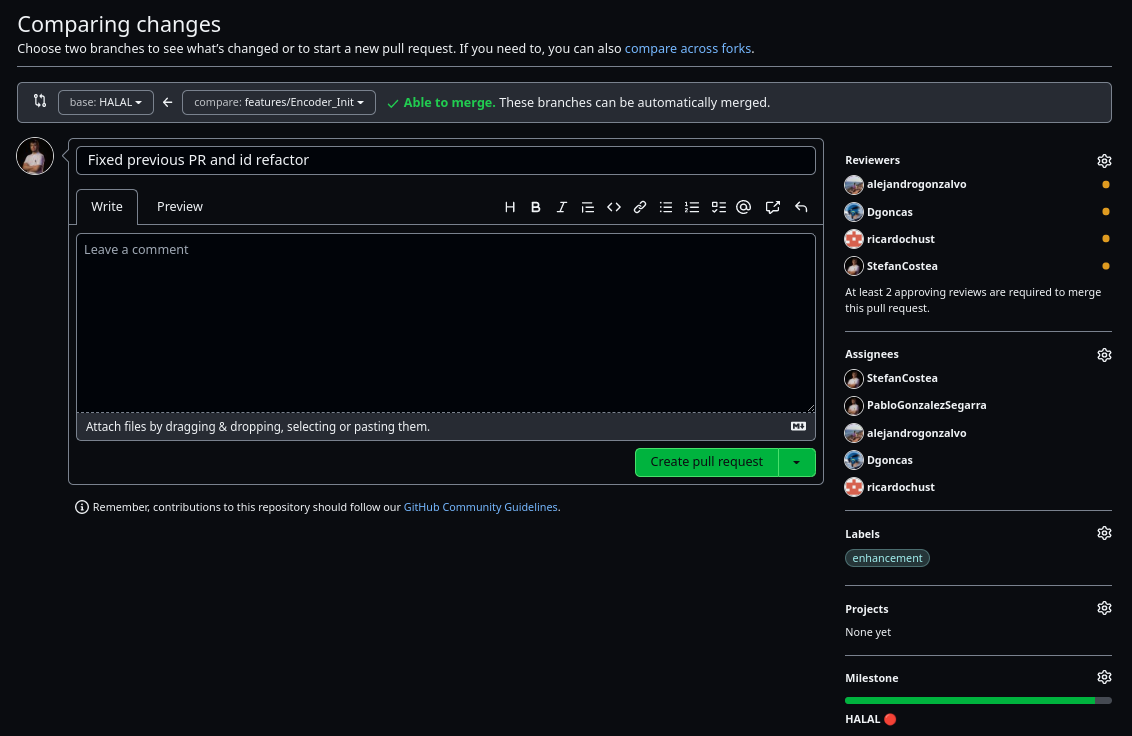
Before creating the pull request it is also important to add as reviewers and assignees all the developers so that the Slack bot notifies them. You must also add the corresponding labels and milestones.
Once your pull request has been accepted you will be able to merge. Finally, if it is not a very important feature, it is recommended to delete the branch.
| ❗ Do not upload your local config files ❗ |
When uploading your code to the repository it is important that you keep in mind a few things. The first and most important is that you should avoid uploading the local configuration files of the project. That is, you should not upload the contents of .cproject among others.
Before you start developing, use this commands to tell git that you don't want to update the standard configuration files:
git update-index --skip-worktree .\.cproject
git update-index --skip-worktree .\.settings\
git update-index --skip-worktree .\.settings\language.settings.xml
It may also be necesary to ignore other files, in this case it is as simple as using the same command but specifying the path to the folder or file that you want to ignore.
If you want to undo this, just do:
git update-index --no-skip-worktree .\.cproject
git update-index --no-skip-worktree .\.settings\
git update-index --no-skip-worktree .\.settings\language.settings.xml
If you are using Linux, remember to change the \ for /.
Issues are an important aspect of development, they allow us to keep track of problems that are found in the library. Anyone who is using our library can open an issue to notify either a problem or a feature that is missing and would like it to be there.
The issues do not have a defined structure but should have a short but descriptive title and in the body of the issue should be explained in as much detail as possible.
It is also important to assign developers and add the corresponding tags. An example of an issue can be seen in the following link
The wiki is becoming more and more important as it serves as a user guide and to document the library. One of the objectives of H8 is to document all the work to be able to transmit all the acquired knowledge and this github option gives us the possibility to do it in a structured way. This allows the access to the information to be comfortable, easy and fast.
Therefore you should learn how to use this tool provided by github. The wiki is made up of pages. Even the footer and the sidebar are pages, and like all pages they can be modified.
Pages are written and structured using markdown which is a simple markup language that allows you to format text using plain text. Knowing the basics of markdown is key to be able to write wiki pages, so it is recommended to follow the official github guide (or any other) which can be accessed through the following link to be able to write the best possible wiki pages.
Apart from formatting the markdown text it also allows you to create graphics like the git branches diagram you have seen above or add code with syntax hightlight among many other things.
Trello is an important aspect when developing the ST-LIB. This tool allows us to stay organized and keep track of the tasks that we have, are or are going to do. This tool is widely known, so you probably know how it is used so we will focus only on how we use it.
Our Trello is constantly evolving, constantly adapting to our needs, so it is possible that the information below is outdated at the time you are reading this, but even so, the idea of use will remain the same.
In the trello you can find all the tasks that have to be carried out, these tasks are usually the ones that come up in the meetings and are assigned to each member by the firmware manager. In other words, you should not assign yourself a task.
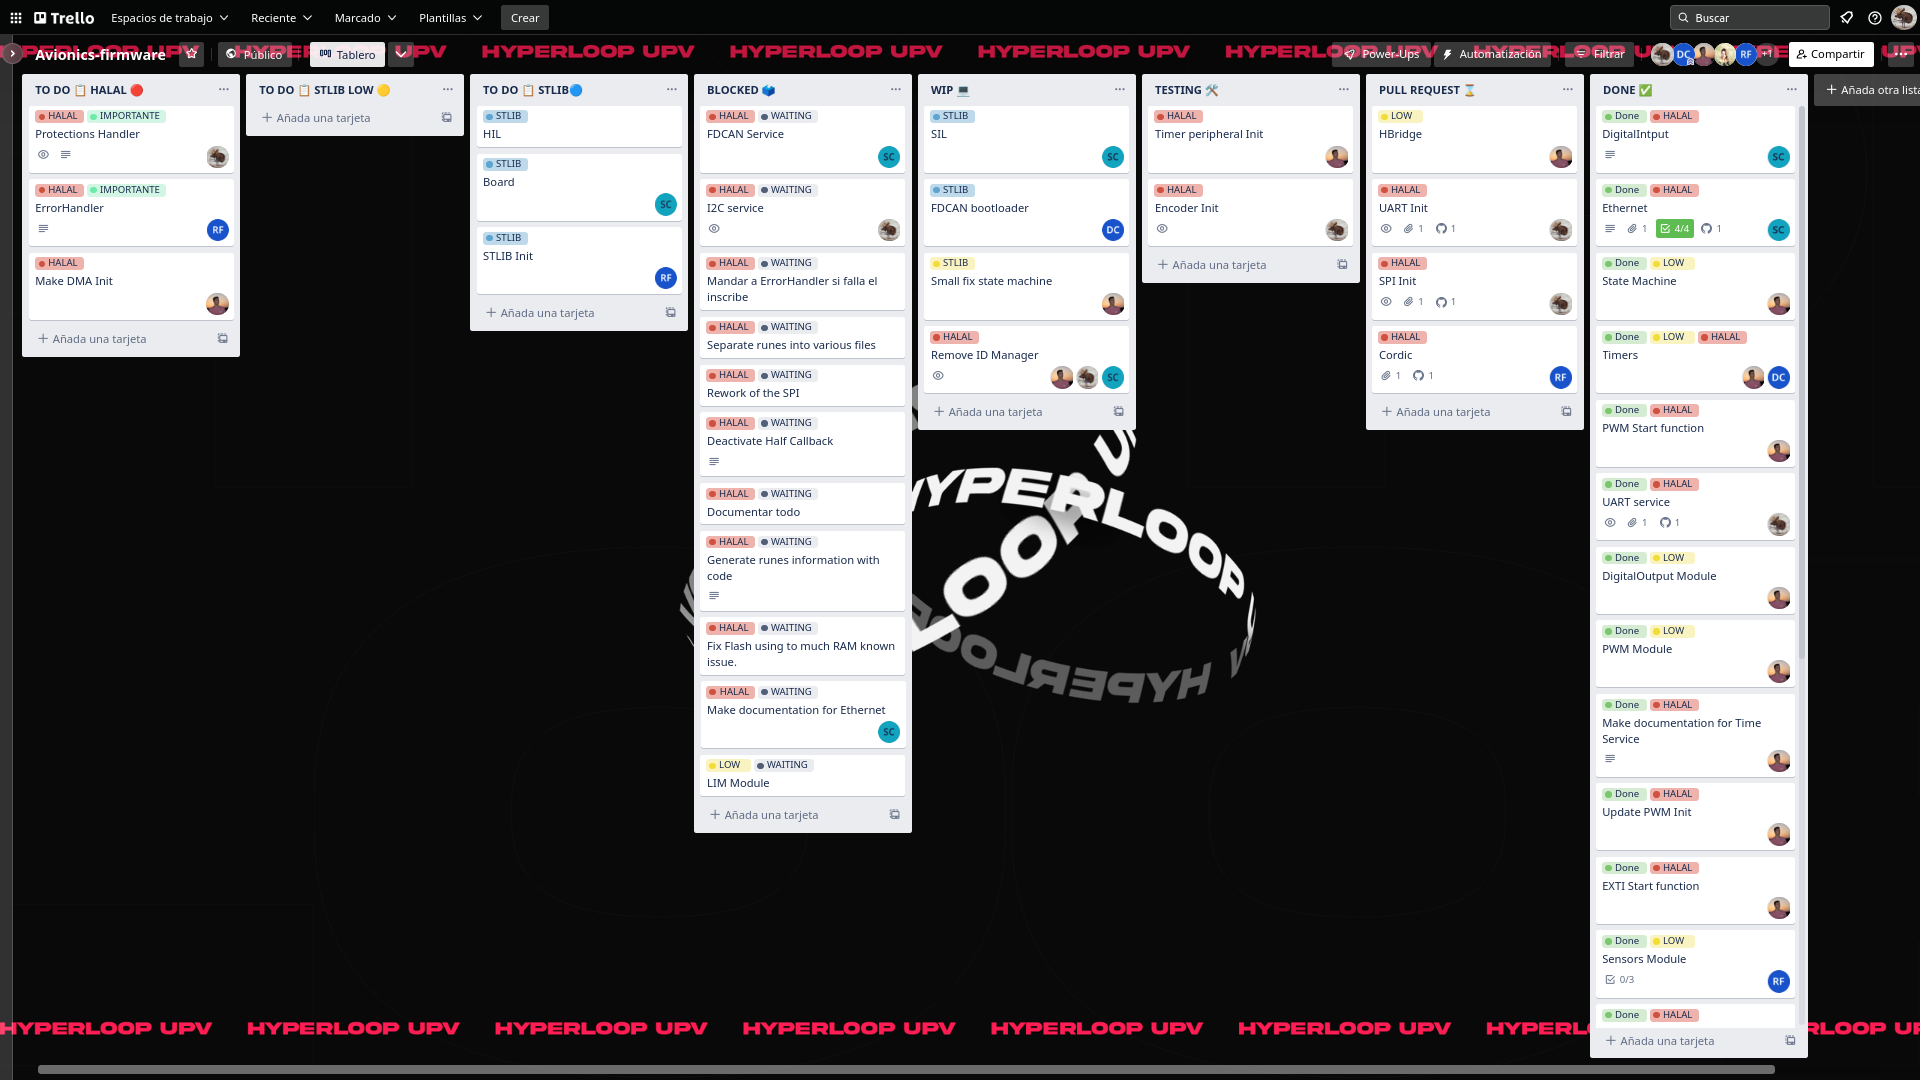
Trello is made up of several sections that allow you to know the status of each task individually as well as the general status.
The first group of sections that we can observe is TODO:, HALAL, ST-LIB LOW and ST-LIB respectively. These ALL will mutate to others as the tasks to be carried out change. These are where the tasks are created and where they stay until they are done if they are important or essential to the project. Thanks to the Trello automation the labels are assigned automatically.
The next section is BLOCKED, in this section are all the tasks that are not essential for the project that would be good to implement if you had the time. This means that the tasks that are there may never be implemented.
Next we find WIP, in this section are the tasks that are being developed at that moment. In TESTING are the tasks that have already been developed and are in the testing phase. In PULL REQUEST go the tasks that have already gone through the two previous phases and are in pull request waiting to be accepted. Finally, when a task is finished, it is added to DONE where all completed tasks are saved.
In this guide we have tried to collect all the basic information that a new library developer and member of the H8 firmware team needs to know in order to start collaborating with the project. Surely there is a lack of information that you will discover as you go deeper into this magical sub-subsystem. Now it is your responsibility to continue learning and continue investigating, who knows if you will be the next member to discover a tool that we had overlooked and get us out of trouble. Have in mind that it is very important to be proactive in all aspects so don't be afraid to do code reviews, write issues or contribute to the wiki.
Remember that the world of firmware can be frustrating but the reward of seeing a vehicle levitate and move inside a vacuum tube thanks to your sweat and tears is an indescribable feeling.
