Below is the description of the WPTelegram Google Script in both English and Persian (Farsi), following the structure of the provided text.
You can use this script to bypass the bans on Telegram API by different hosts. Simply send the request to this script instead of the Telegram Bot API after deploying it as a web app and allowing anonymous access.
It accepts both GET and POST requests with the following parameters:
| Name | Type | Description |
|---|---|---|
bot_token |
String | The Telegram Bot Token |
method |
String | Telegram Bot API method name, e.g., sendMessage |
args |
JSON Object | The arguments/parameters for the API method, e.g., {"chat_id":"123","text":"HelloWorld"} |
See the screenshots below 👇
- Go to script.google.com and sign in if required.
- Create a new project and give it a name you love :)
- It should open a file (Code.gs by default). Remove the contents of this file.
- Copy the contents of wptelegram-google-script.gs and paste them into your project file (Code.gs).
- Click on Save (💾) or press
Ctrl+S. - Click "Deploy" at the top and select "New deployment" to open a popup.
- Inside the popup, click on "Select type" ⚙️ and choose "Web app".
- In "Web app", for Execute as, select "Me ()" [IMPORTANT].
- In "Who has access", select "Anyone" [IMPORTANT].
- Click on "Deploy" to open the Authorization box.
- Click on "Authorize access" to authorize the script.
- In the popup window, select your Google Account.
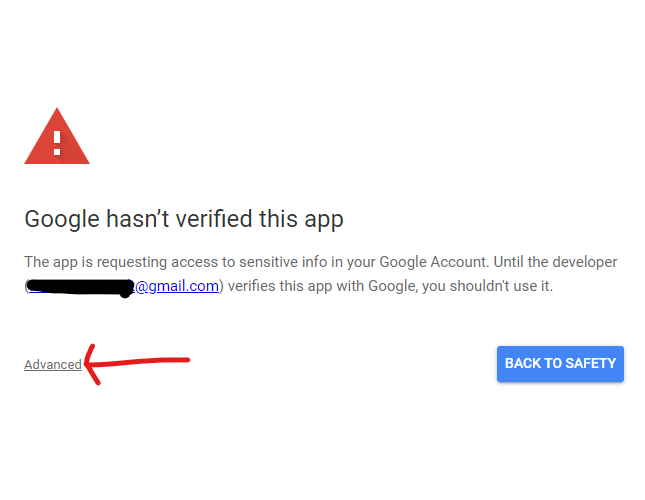
- If you see a warning "Google hasn't verified this app", it’s fine to click "Advanced" and choose "Go to (unsafe)".
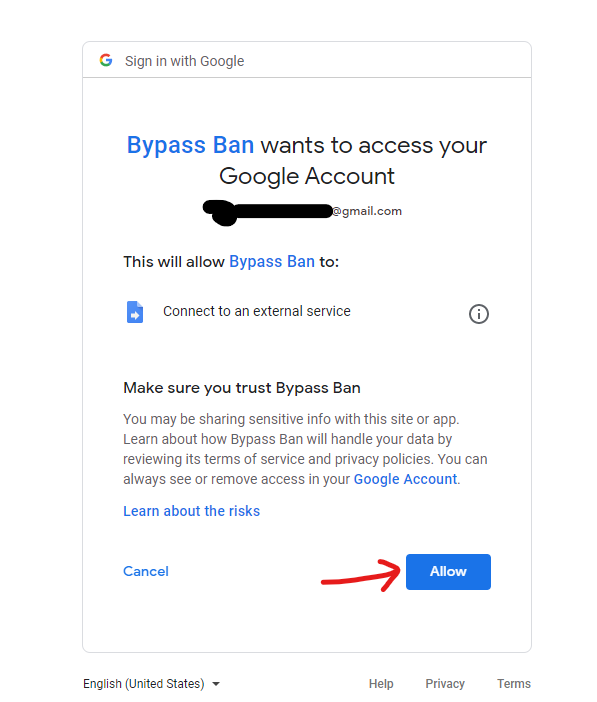
- On the next screen, click "Allow".
- After redirect, you should see "Deployment successfully updated".
- Copy the "Web app URL" and paste it into your app or plugin.
شما میتوانید از این اسکریپت برای دور زدن محدودیتهای اعمالشده بر API تلگرام توسط میزبانهای مختلف استفاده کنید. کافی است درخواست را به جای API ربات تلگرام، به این اسکریپت ارسال کنید پس از اینکه آن را به عنوان یک برنامه وب مستقر کرده و دسترسی ناشناس را مجاز کردهاید.
این اسکریپت درخواستهای GET و POST را با پارامترهای زیر میپذیرد:
| نام | نوع | توضیحات |
|---|---|---|
bot_token |
رشته | توکن ربات تلگرام |
method |
رشته | نام متد API ربات تلگرام، به عنوان مثال sendMessage |
args |
شیء JSON | آرگومانها/پارامترهای متد API، به عنوان مثال {"chat_id":"123","text":"HelloWorld"} |
تصاویر را در پایین 👇 ببینید
- به script.google.com بروید و در صورت نیاز وارد حساب کاربری خود شوید.
- یک پروژه جدید ایجاد کنید و نامی که دوست دارید برای آن انتخاب کنید :)
- باید یک فایل (به طور پیشفرض Code.gs) باز شود. محتوای این فایل را حذف کنید.
- محتوای wptelegram-google-script.gs را کپی کرده و در فایل پروژه (Code.gs) جایگذاری کنید.
- روی ذخیره (💾) کلیک کنید یا
Ctrl+Sرا فشار دهید. - روی "استقرار" (Deploy) در بالای صفحه کلیک کنید و "استقرار جدید" (New deployment) را انتخاب کنید تا یک پنجره باز شود.
- در پنجره بازشده، روی "انتخاب نوع" ⚙️ کلیک کنید و "برنامه وب" (Web app) را انتخاب کنید.
- در بخش "برنامه وب"، برای اجرا به عنوان، گزینه "من (<ایمیل شما>)" را انتخاب کنید [مهم].
- در بخش *"چه کسانی دسترسی دارند"، گزینه "همه" (Anyone) را انتخاب کنید [مهم].
- روی "استقرار" (Deploy) کلیک کنید تا کادر مجوز باز شود.
- روی "مجوز دسترسی" (Authorize access) کلیک کنید تا اسکریپت مجاز شود.
- در پنجره بازشده، حساب گوگل خود را انتخاب کنید.
- اگر هشداری با عنوان "گوگل این برنامه را تأیید نکرده است" مشاهده کردید، مشکلی نیست؛ روی "پیشرفته" (Advanced) کلیک کنید و گزینه "رفتن به <نام برنامه> (ناامن)" را انتخاب کنید.
- در صفحه بعدی، روی "اجازه" (Allow) کلیک کنید.
- پس از هدایت مجدد، باید پیام "استقرار با موفقیت بهروزرسانی شد" را ببینید.
- "آدرس وب برنامه" (Web app URL) را کپی کرده و در اپلیکیشن یا افزونه خود جایگذاری کنید.