This project aims to provide a template for clean architecture in Python applications.
The main idea of Clean Architecture by Robert C. Martin (Uncle Bob) is to separate the concerns of the application into different layers, so that the application is more maintainable and scalable. Here are the main principles of clean architecture from the original article:
- Independent of Frameworks. The architecture does not depend on the existence of some library of feature laden software. This allows you to use such frameworks as tools, rather than having to cram your system into their limited constraints.
- Testable. The business rules can be tested without the UI, Database, Web Server, or any other external element.
- Independent of UI. The UI can change easily, without changing the rest of the system. A Web UI could be replaced with a console UI, for example, without changing the business rules.
- Independent of Database. You can swap out Oracle or SQL Server, for Mongo, BigTable, CouchDB, or something else. Your business rules are not bound to the database.
- Independent of any external agency. In fact your business rules simply don’t know anything at all about the outside world.
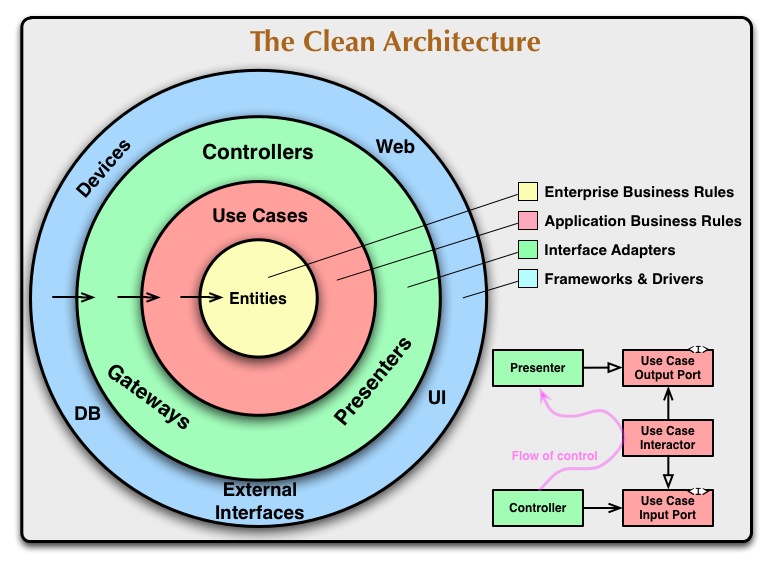
The diagram from the article also shows the different layers of the clean architecture and the dependencies between them:
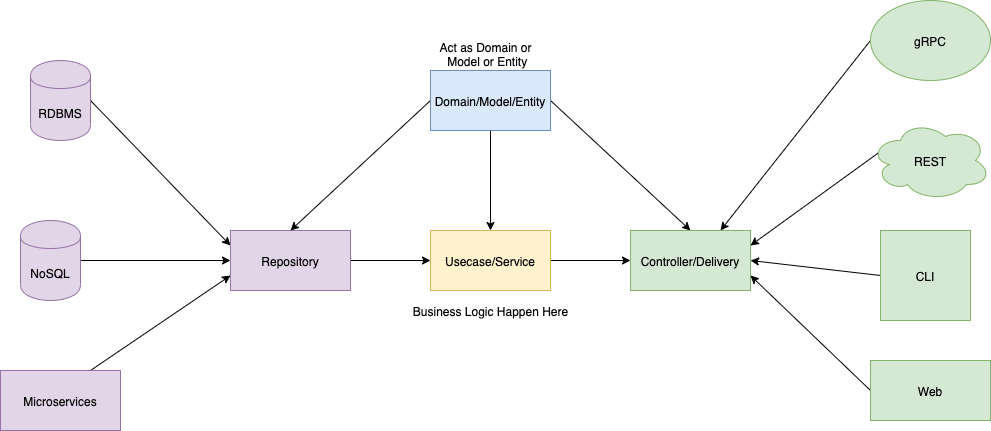
There is another diagram from go-clean-arch by bxcodec which is more intuitive for me:
Based on the concept of clean architecture, this project contains the following layers:
- Core layer (
/core): The entities layer, which contains the core business rules and logic - Service layer (
/service): The use cases layer, which contains the application of business rules and logic - Repository layer (
/repository): The infrastructure layer, which contains the data access logic - API layer (
/api): The presentation layer, which contains the HTTP API endpoints
First, setup the environment variables, please refer to the .env.example file. Ask your team for the values. You can create a new .env file by running the following command:
cp .env.example .envYou can quickly start the server with docker compose:
docker compose -f docker-compose.yml up --remove-orphans -dIn this example, we use PostgreSQL as the database, please make sure you have it installed locally, you can set the DATABASE_URL in the .env file to connect to your local database:
DATABASE_URL=postgresql+asyncpg://postgres:postgres@localhost:5432/python_clean_archOr you can use docker compose file we provided to quickly setup one:
docker compose -f docker-compose.db.yml up --remove-orphans -dYou can change the POSTGRES_DB, POSTGRES_USER, POSTGRES_PASSWORD in the .env file to change the database info of docker container.
Please remember to align the DATABASE_URL with the POSTGRES_DB, POSTGRES_USER, POSTGRES_PASSWORD in the .env file.
After the database is running, you can initialize the database by running the following commands:
make init-dbuv is used to manage the dependencies and virtual environment, make sure you have it installed before you start.
-
Install dependencies
uv sync
-
Run the server
make run
VSCode is recommended for development, before you start, make sure you have installed the Python and Python Debugger extensions.
-
First, you need to install the dependencies, see With uv
-
Then, select the correct python interpreter in VSCode by press
cmd + shift + pand searchPython: Select Interpreter. The python interpreter should be the one you installed in the first step, usually you can find the uv-managed virtual environment in the list. -
Then, you need to set up the debugger configuration for VSCode:
cp .vscode/launch.example.json .vscode/launch.json
-
Choose the "FastAPI" configuration from the VSCode and run it.
Make sure you have installed the dependencies with uv:
uv syncThen, you can run the unit tests by the following command:
make run-unit-testsYou can also run the unit tests with docker:
docker build -f Dockerfile.dev -t app-test --build-arg RUN_MODE=test . && docker run app-testOnce the server is running, visit the Swagger UI at http://localhost:7086/docs
For VSCode, run the following command to setup the editor config:
cp .vscode/settings.example.json .vscode/settings.json