If you want to learn more about how to use and the assumptions behind this repo, please read this article https://dev.to/ddesio/superpower-rest-api-dx-with-serverless-and-devops-best-practices-with-aws-51f6
Comments, share, PRs are welcomed.
This repo is strongly based on implementing a REST API following AWS Serverless Multi-Tier Architectures with Amazon API Gateway and AWS Lambda architecture patterns.
This repo contains a serverless REST API which:
- use AWS Lambda as compute layer of serverless tier
- use API Gateway as interface layer of serverless tier
- use AWS RDS Mysql 8.0 as data tier
- use AWS CodePipeline and CodeBuild as CI/CD Pipeline to deploy the API
In this repo we adopt those DevOps practices:
- IaC with Serverless Framework and Cloudformation
- OpenAPI documentation and Doc as Code integrated in IaC with Serverless OpenApi Documenter plugin
- TDD with jest based on OpenAPI Doc
- CI/CD
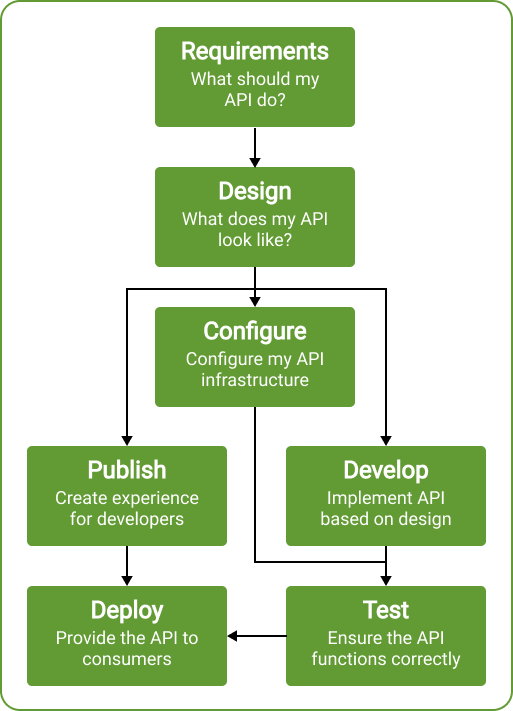
We suggest you to base your development process following those steps:
- get requirements
- design your API with OpenAPI
- configure infrastructure in IaC (IaC with serverless framework)
- decorate your IaC with Doc As Code using your OpenAPI specification (DaC with serverless openapi documenter)
- write test to ensure OpenAPI is validated and functionality is as expected (TDD with jest)
- write code until all our test are green
- deploy both API and documentation using CI/CD
To start working locally and deploy this project you'll need to install and configure serverless following those steps:
- Install Serverless
npm install -g osls
- Install serverless offline plugin
sls plugin install -n serverless-offlineThis repo comes with a mysql-8 docker container, if you want to use a local database as your local environment. Skip this step if you use an AWS RDS database. Execute this script to start it.
npm run dbThen connect with your preferred client to mysql:mysql@localhost:3306/mysql
You can use any mysql database instance you prefer (as AWS RDS in cloud) simply changing .env.* vars.
#RDS CONFIG
DB_HOST=localhost
DB_DATABASE=mysql
DB_USERNAME=mysql
DB_PASSWORD=mysql
To successfully run this repo please connect to your database and create user table as follow
CREATE TABLE `user` (
  `id` int NOT NULL AUTO_INCREMENT,
  `email` varchar(100) DEFAULT NULL,
  PRIMARY KEY (`id`)
) ENGINE=InnoDB AUTO_INCREMENT=1 DEFAULT CHARSET=utf8mb4;Start serverless offline from root directory
npm installsls offlineIt will start for you a server and run the api at http://localhost:3000 emulating API Gateway and Lambda locally with serverless-offline plugin
It will use your .env.local configuration if present, or your .env.dev configuration as a fallback.
Serverless architecture is defined in root file serverless.yml.
This file is made up of very important sections:
- service: name of your deployed service
- frameworkVersion: to define serverless version
- useDotEnv: to load .env files
- provider: global definitions for AWS provider, loaded with a
config/serverless-provider.ymlfile - plugins: serverless plugin list which are used by this project, loaded with a
config/serverless-plugins.ymlfile - functions: definition for each function, loaded by specific file for each function (
src/**/**/serverless.yml) - custom: custom definitions
Generate documentation running in root directory
npm run docThis scripts uses serverless-openapi-documenter and @redocly/cli
to create doc resources in doc folder:
doc/openapi.json: a OpenApiV3 specification of your API in json formatdoc/openapi.yaml: a OpenApiV3 specification of your API in yaml formatdoc/postman.json: a prepared postman collection to consume your APIdoc/index.html: a static doc file which could be deployed to be consulted (we suggest you to deploy to S3+Cloudformation)
Sample tests are implemented using jest and jest-openapi
Tests under _tests_ folder, validate request and response model against generated OpenApi V3 specification, which are defined in your severless.yml architecture file (importing models folder files).
Please be sure to generate doc files before testing running
npm run docThen copy .env.dist to .env.test, and customize your env vars.
Finally, run your test with
npm run testThis command will run for you jest defining .env.test as dotenv file to be used as follow
DOTENV_CONFIG_PATH=.env.test jest --coverageYou'll find your test coverage under coverage folder.
It is a best practice to reduce lambda package footprint (package size) and general cloud footprint (unused resources).
To reduce your lambda footprint:
- package individually each function in your
serverless.ymlfile as we have done in this repo
## Package individually each function
package:
individually: true- define always
packagetag with patterns for include only needed file for each function as we have done in this repo
package: #package patterns
    include:
      - "!**/*"
      - src/function/hello/**
To reduce your cloud footprint, delete unused lambda version and layers which were created deploying your api. You can use serverless-prune-plugin as we have done in this repo to automatically prune older version as follow:
prune: #enable prune
    automatic: true #allow automatic prune
    includeLayers: true #allow layers prune
    number: 3 #retain at lease 3 version
Before proceed:
- Create AWS access key or ask one to your team
- Configure local serverless profiles for dev, staging, prod environments with
sls config credentials --provider aws --key <key> --secret <secret> --profile dev
sls config credentials --provider aws --key <key> --secret <secret> --profile staging
sls config credentials --provider aws --key <key> --secret <secret> --profile prod
Please be sure to update those variables in your .env.* files.
You should have at least three files: .env.dev, .env.staging and .env.prod.
Those will be used to deploy respectively dev, staging and prod stages.
#APP CONFIG
SERVICE_NAME=my-api
APP_ENV=dev
STAGE_NAME=dev
#AWS CONFIG
AWS_REGION=eu-west-1 ##AWS REGION
SG1=xxx #LAMBDA SECURITY GROUP IN DEV/PROD VPC
SUBNET1=xxx #VPC PRIVATE SUBNET1 IN DEV/PROD VPC
SUBNET2=xxx #VPC PRIVATE SUBNET1 IN DEV/PROD VPC
SUBNET3=xxx #VPC PRIVATE SUBNET1 IN DEV/PROD VPC
#RDS CONFIG
DB_HOST=xxx
DB_DATABASE=xxx
DB_USERNAME=xxx
DB_PASSWORD=xxx
Be aware to update RDS Config environment variables depending on the stage (dev/staging/prod). Be aware to update SG and SUBNETS variables depending on the stage (dev/staging/prod).
Run this choosing a stage (dev/staging/prod) and relative profile (dev/staging/prod) when deploying
sls deploy --aws-profile $PROFILE --stage $STAGE_NAME You will find a preconfigured buildspec.yml which install, build, deploy and generate docs on AWS cloud.
You can use it as build specification for AWS CodeBuild project triggered by AWS CodePipeline.
We suggest you to have a specific pipeline per stage dev/staging/v1 connected to specific branches on git (using gitflow).
We ensure a separate Cloud Stack per each stage and version (i.e dev, staging, uat, v1).
A CloudFormation template under .dev/cf/api-resources.yaml template is useful to create all cloud resources needed:
- one VPC, with 3 public subnet and 3 private subnet (shared between versions)
- one NATGW (AZ-1A) (please change this to three, one per each private to be compliant with HA standards)
- an RDS as database (you can choose to use DynamoDB as well to be full serverless)
- needed security groups to let services be able to connect and communicate
- a Codebuild Project, shared between our pipelines, to build and deploy your doc and solution
- three Pipelines as CI/CD to deploy dev, staging, v1 versions of this API
- one S3 bucket to store documentation versioned under "stage named" prefix
- Coudfront Distribution to expose documentation
You should create parameters DB-PASSWORD in ParameterStore, and load SSL certificate before launch this template.