Welcome to the first EmSys Labs.
The lab setup guide can be found [here].
[A list of useful acronym and terms can be found here]
Assessment will consist of both code submissions and a logbook for the lab, written in markdown format. You will use git to manage and submit your logbook, and each group will have a private GitHub repository created for them. Don't worry if you are unfamiliar with git, we will be using basic features.
An example of what your lab logbook repository will look like can be found [here].
- A good guide on
gitcan be found here [link]. - If you need to install git, please follow the instructions [here].
An example of what your empty logbook repository will look like can be found [here]. When you get an email with your repository, use the following commands to get access to it:
git clone <LINK TO YOUR PRIVATE LOGBOOK REPOSITORY>
The bulk of the text of your logbook will be contained in README.md in the top-level directory of your private repository. You will add your answers and discuss the lab in this document using a markup language called markdown. A useful guide for markdown can be found [here].
Say you answer a question in the README.md of your private repository. Now you need to save the changes. Type the following commands to push your changes to GitHub.
        git add README.md
        git commit -m "some text describing the changes you've made"
        git push
The commands above will then push the changes that you have made to the GitHub repository. Don't worry about making mistakes here; you can push further changes to your answers, only the final submission will be marked. This is the very basics of git, a better tutorial can be found [here].
Along with discussions in the README.md we also expect code submissions for some of the questions. For each of the code submissions a template Arduino sketch has been created. Modify these templates with your code and push your changes in the same way you would with the README.md file above. For example, say we made changes to the template sketch, HelloWordl/HelloWorld.ino. We would then push our changes with the following commands:
        git add HelloWorld/HelloWorld.ino
        git commit -m "some text describing the changes you've made"
        git push

Each of the pins next to the TinyPico correspond to GPIO pins in [this diagram (upsidedown)].
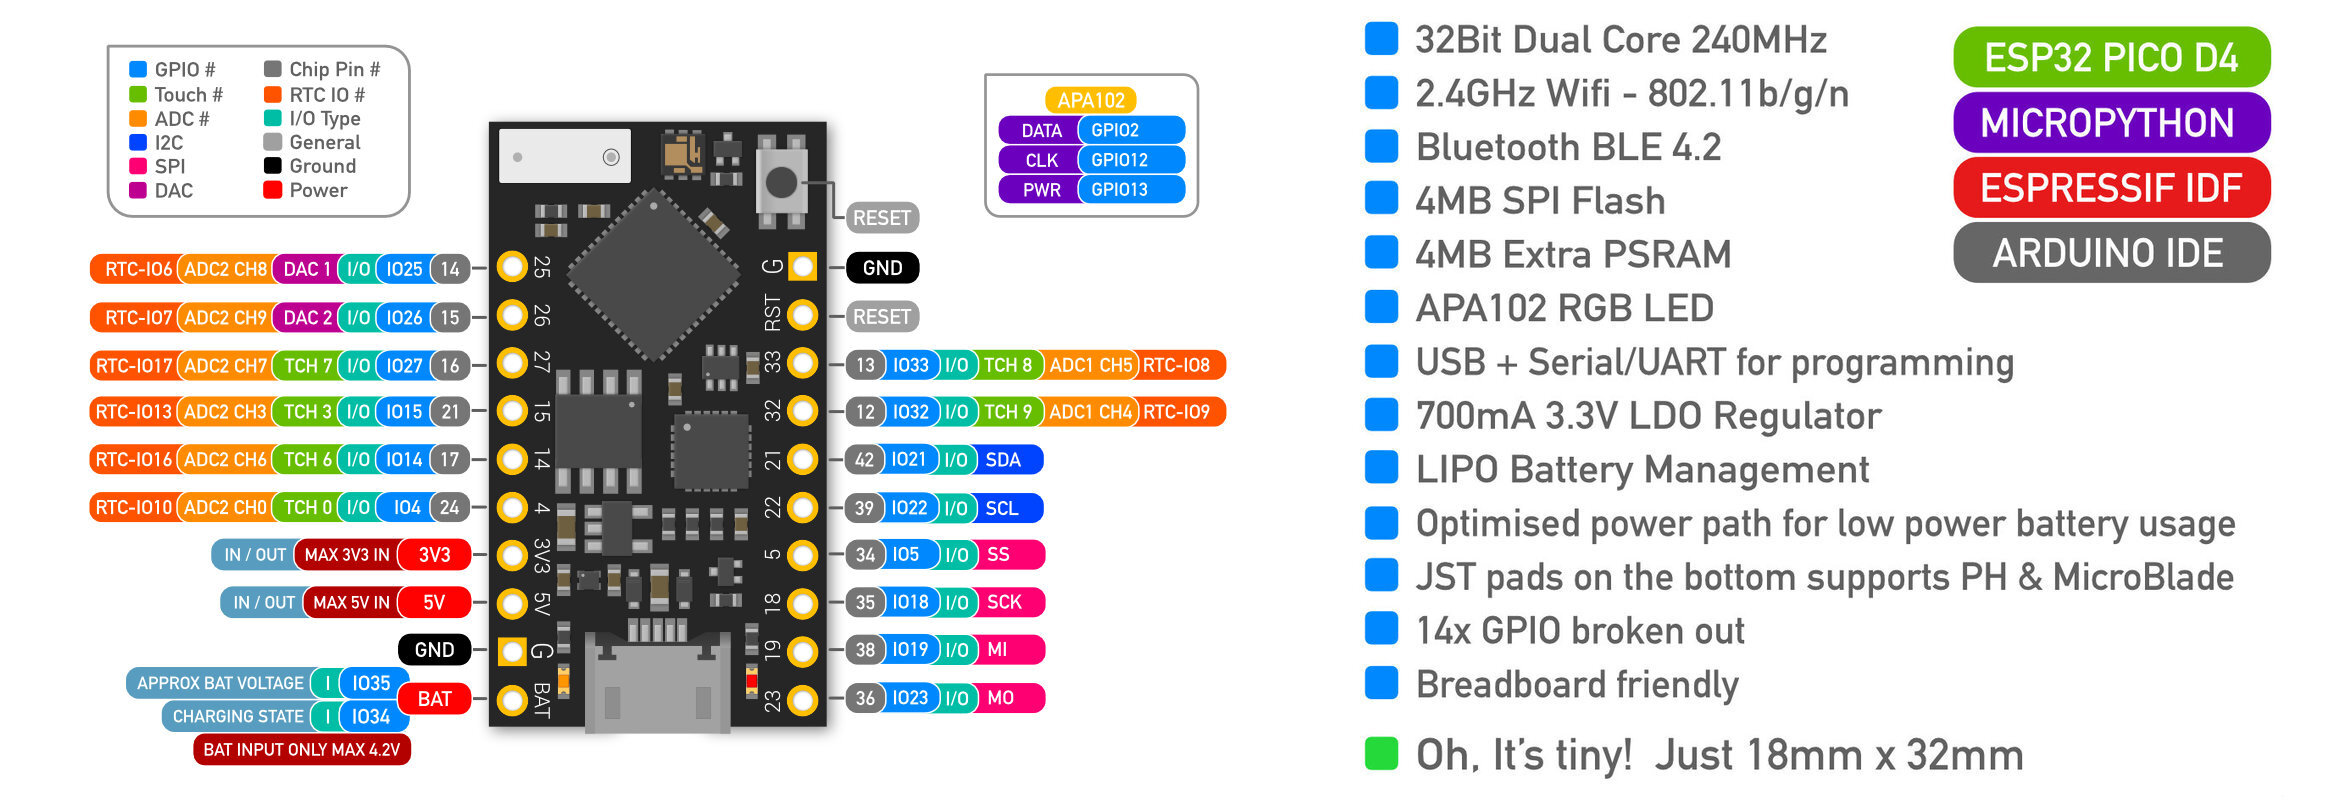
In the lab we are going to use WebSockets to communicate with a virtual EmSys lab server. To view the EmSys virtual Lab visit the following link (no VPN required)
[http://ec2-52-15-138-171.us-east-2.compute.amazonaws.com:4000/]
This server contains a virtual world, with a virtual embedded device for each of the lab groups on the course. This virtual embedded device is called a dotDevice and it has a data sheet that can be found here: [DotDevice Datasheet].
You can make your dotDevice move around, change colour, change size, and say something. It also has some command memory and a timer, allowing you to load in a sequence and execute it. However, there is a strict protocol for interacting with your dotDevice, which you can find in the data sheet.
To communicate with our dotDevice we will be using ArduinoWebSockets [link]. In [src/WSHelloWorld] there is an example that sends a "Hello World!" message using the in lab WiFi network. The details of the lab WiFi are:
        ssid: NETGEAR35
        password: magicalfinch482
If you are using your own device at home then please change you WiFi details appropriately... and take care when pushing your code to your git logbook not to accidentally publish your WiFi credentials.
You also need to change the example code so that instead of sending websocket messages to the server ws://192.168.1.2:1234 you need to send it to http://ec2-3-16-149-187.us-east-2.compute.amazonaws.com:1234.
You can use the [src/WSHelloWorld] code as a base for communicating with your dotDevice.
Modify the example code to see if you can make it send a message to the chat section of the virtual lab and see if you can spot it.
Once you have managed to send a message, you need to look at the dotDevice datasheet and get it to complete the following tasks, recording them in your logbook. You should have already been assigned a unique ID for your dotDevice, if you are not sure what your unique dotDevice ID is please ask a question in the raise-your-hand Discord channel and a demonstrator will be of assistance.
One of the first things you need to do is to locate where your dotDevice is. Make it say something unique.
- Make your dotDevice say something. Text must appear smoothly and not jitter.
- Make your dotDevice do a dance.
- Make your dotDevice change colour periodically.
- Make your dotDevice speak, dance, change, colour, and size periodically in a single program.
- Document your routine and challenges you found while developing it
You may have noticed that you dotDevice is not always very responsive due to the amount of WiFi traffic on the network. This will become really bad once many devices start hammering the network. Luckily the dotDevice is programmable and contains some onboard command memory.
- Think about how you can use the onboard command memory of your dotDevice to improve it's performance, document your thoughts in your logbook.
- Use the programmable memory of your dotDevice to program it to do the routine (or something similar) to the previous one.
- Create a program that periocially uploads a command sequence to the dotDevices programmable memory that incoporates random elements. Use a pointer to the true hardware random number generator on the device to do this.