Linux, shell scripting, file permissions, access control lists, Package Manager and Systemctl, docker, jenkins, git, kubernetes, cloud(aws), terraform, ansible and Grafana
ls option_flag arguments --> list the sub directories and files avaiable in the present directory
Examples:
-
ls -l--> list the files and directories in long list format with extra information -
ls -a--> list all including hidden files and directory -
ls *.sh--> list all the files having .sh extension. -
ls -i--> list the files and directories with index numbers inodes -
ls -d */--> list only directories.(we can also specify a pattern)
-
pwd--> print work directory. Gives the present working directory. -
cd path_to_directory--> change directory to the provided path -
cd ~or justcd--> change directory to the home directory -
cd ---> Go to the last working directory. -
cd ..--> change directory to one step back. -
cd ../..--> Change directory to 2 levels back. -
mkdir directoryName--> to make a directory in a specific location
Examples:
mkdir newFolder              # make a new folder 'newFolder'

mkdir .NewFolder              # make a hidden directory (also . before a file to make it hidden)

mkdir A B C D                  #make multiple directories at the same time

mkdir /home/user/Mydirectory   # make a new folder in a specific location

mkdir -p  A/B/C/D              # make a nested directory
Task: What are the Linux commands to
- View the content of a file and display line numbers.
- Change the access permissions of files to make them readable, writable, and executable by the owner only.
- Check the last 10 commands you have run.
- Remove a directory and all its contents.
- Create a
fruits.txtfile, add content (one fruit per line), and display the content. - Add content in
devops.txt(one in each line) - Apple, Mango, Banana, Cherry, Kiwi, Orange, Guava. Then, append "Pineapple" to the end of the file. - Show the first three fruits from the file in reverse order.
- Show the bottom three fruits from the file, and then sort them alphabetically.
- Create another file
Colors.txt, add content (one color per line), and display the content. - Add content in
Colors.txt(one in each line) - Red, Pink, White, Black, Blue, Orange, Purple, Grey. Then, prepend "Yellow" to the beginning of the file. - Find and display the lines that are common between
fruits.txtandColors.txt. - Count the number of lines, words, and characters in both
fruits.txtandColors.txt.
Reference: Linux Commands for DevOps Used Day-to-Day
Task 1: View the content of a file and display line numbers.

Task 2: Change the access permissions of files to make them readable, writable, and executable by the owner only.

Task 3: Check the last 10 commands you have run.

Task 4: Remove a directory and all its contents.

Task 5: Create a fruits.txt file, add content (one fruit per line), and display the content.

Task 6: Add content in devops.txt (one in each line) - Apple, Mango, Banana, Cherry, Kiwi, Orange, Guava. Then, append "Pineapple" to the end of the file.


Task 7: Show the first three fruits from the file in reverse order.

Task 8: Show the bottom three fruits from the file, and then sort them alphabetically.

Task 9: Create another file Colors.txt, add content (one color per line), and display the content.

Task 10: Add content in Colors.txt (one in each line) - Red, Pink, White, Black, Blue, Orange, Purple, Grey. Then, prepend "Yellow" to the beginning of the file.

Task 11: Find and display the lines that are common between fruits.txt and Colors.txt.

Task 12: Count the number of lines, words, and characters in both fruits.txt and Colors.txt.

The kernel is a computer program that is the core of a computer’s operating system, with complete control over everything in the system.
A shell is a special user program that provides an interface for users to interact with operating system services. It accepts human-readable commands from users and converts them into instructions that the kernel can understand. The shell is a command language interpreter that executes commands read from input devices such as keyboards or from files. It starts when the user logs in or opens a terminal.
Linux shell scripting involves writing programs (scripts) that can be run by a Linux shell, such as bash (Bourne Again Shell). These scripts automate tasks, perform system administration tasks, and facilitate the interaction between users and the operating system.
Tasks:
- Explain in your own words and with examples what Shell Scripting means for DevOps.
- What is
#!/bin/bash? Can we write#!/bin/shas well? - Write a Shell Script that prints
I will complete #90DaysOfDevOps challenge. - Write a Shell Script that takes user input, input from arguments, and prints the variables.
- Provide an example of an If-Else statement in Shell Scripting by comparing two numbers.
Were the tasks challenging?
These tasks are designed to introduce you to basic concepts of Linux shell scripting for DevOps.
Article Reference: Click here to read basic Linux Shell Scripting
YouTube Video: EASIEST Shell Scripting Tutorial for DevOps Engineers
Task 1: Explain in your own words and with examples what Shell Scripting means for DevOps.
- 'Shell Scripting is writing a series of commands in a script file to automate tasks in the Unix/Linux shell. For DevOps, shell scripting is crucial for automating repetitive tasks, managing system configurations, deploying applications, and integrating various tools and processes in a CI/CD pipeline. It enhances efficiency, reduces errors, and saves time.'
Example: Automating server setup


Task 2: What is #!/bin/bash? Can we write #!/bin/sh as well?
#!/bin/bashis called a "shebang" line. It indicates that the script should be run using the Bash shell.#!/bin/bash: Uses Bash as the interpreter. It supports advanced features like arrays, associative arrays, and functions.#!/bin/sh: Uses the Bourne shell. It’s more POSIX-compliant and is generally compatible with different Unix shells.

Task 3: Write a Shell Script that prints I will complete #90DaysOfDevOps challenge.

Task 4: Write a Shell Script that takes user input, input from arguments, and prints the variables.

Task 5: Provide an example of an If-Else statement in Shell Scripting by comparing two numbers.

If you noticed that there are a total of 90 sub-directories in the directory '2023' of this repository, what did you think? How did I create 90 directories? Manually one by one, using a script, or a command?
All 90 directories were created within seconds using a simple command:
mkdir day{1..90}
-
Create Directories Using Shell Script:
- Write a bash script
createDirectories.shthat, when executed with three arguments (directory name, start number of directories, and end number of directories), creates a specified number of directories with a dynamic directory name. - Example 1: When executed as
./createDirectories.sh day 1 90, it creates 90 directories asday1 day2 day3 ... day90. - Example 2: When executed as
./createDirectories.sh Movie 20 50, it creates 31 directories asMovie20 Movie21 Movie22 ... Movie50.
Notes: You may need to use loops or commands (or both), based on your preference. Check out this reference: Bash Scripting For Loop
- Write a bash script
-
Create a Script to Backup All Your Work:
- Backups are an important part of a DevOps Engineer's day-to-day activities. The video in the references will help you understand how a DevOps Engineer takes backups (it can feel a bit difficult but keep trying, nothing is impossible).
- Watch this video for guidance.
In case of doubts, post them in the Discord Channel for #90DaysOfDevOps.
-
Read About Cron and Crontab to Automate the Backup Script:
- Cron is the system's main scheduler for running jobs or tasks unattended. A command called crontab allows the user to submit, edit, or delete entries to cron. A crontab file is a user file that holds the scheduling information.
- Watch this video for reference: Cron and Crontab.
-
Read About User Management:
- A user is an entity in a Linux operating system that can manipulate files and perform several other operations. Each user is assigned an ID that is unique within the system. IDs 0 to 999 are assigned to system users, and local user IDs start from 1000 onwards.
- Create 2 users and display their usernames.
- Check out this reference: User Management in Linux.
-
Create Directories Using Shell Script:
- Write a bash script
createDirectories.shthat, when executed with three arguments (directory name, start number of directories, and end number of directories), creates a specified number of directories with a dynamic directory name. - Example 1: When executed as
./createDirectories.sh day 1 90, it creates 90 directories asday1 day2 day3 ... day90. - Example 2: When executed as
./createDirectories.sh Movie 20 50, it creates 31 directories asMovie20 Movie21 Movie22 ... Movie50.
Answer


- Write a bash script
-
Create a Script to Backup All Your Work:
- Backups are an important part of a DevOps Engineer's day-to-day activities. The video in the references will help you understand how a DevOps Engineer takes backups (it can feel a bit difficult but keep trying, nothing is impossible).
Answer


-
Read About Cron and Crontab to Automate the Backup Script:
- Cron is the system's main scheduler for running jobs or tasks unattended. A command called crontab allows the user to submit, edit, or delete entries to cron. A crontab file is a user file that holds the scheduling information.
Answer


-
Read About User Management:
- A user is an entity in a Linux operating system that can manipulate files and perform several other operations. Each user is assigned an ID that is unique within the system. IDs 0 to 999 are assigned to system users, and local user IDs start from 1000 onwards.
- Create 2 users and display their usernames.
Answer


The concept of Linux file permission and ownership is important in Linux. Today, we will work on Linux permissions and ownership, and perform tasks related to both.
-
Understanding File Permissions:
- Create a simple file and run
ls -ltrto see the details of the files. Refer to Notes - Each of the three permissions are assigned to three defined categories of users. The categories are:
- Owner: The owner of the file or application.
- Use
chownto change the ownership permission of a file or directory.
- Use
- Group: The group that owns the file or application.
- Use
chgrpto change the group permission of a file or directory.
- Use
- Others: All users with access to the system (outside the users in a group).
- Use
chmodto change the other users' permissions of a file or directory.
- Use
- Owner: The owner of the file or application.
- Task: Change the user permissions of the file and note the changes after running
ls -ltr.
- Create a simple file and run
-
Writing an Article:
- Write an article about file permissions based on your understanding from the notes.
-
Access Control Lists (ACL):
- Read about ACL and try out the commands
getfaclandsetfacl. - Task: Create a directory and set specific ACL permissions for different users and groups. Verify the permissions using
getfacl.
- Read about ACL and try out the commands
-
Additional Tasks:
- Task: Create a script that changes the permissions of multiple files in a directory based on user input.
- Task: Write a script that sets ACL permissions for a user on a given file, based on user input.
-
Understanding Sticky Bit, SUID, and SGID:
- Read about sticky bit, SUID, and SGID.
- Task: Create examples demonstrating the use of sticky bit, SUID, and SGID, and explain their significance.
-
Backup and Restore Permissions:
- Task: Create a script that backs up the current permissions of files in a directory to a file.
- Task: Create another script that restores the permissions from the backup file.
In case of any doubts, post them on the Discord Community.
-
Understanding File Permissions:
- Create a simple file and run
ls -ltrto see the details of the files. - Each of the three permissions are assigned to three defined categories of users. The categories are:
- Owner: The owner of the file or application.
- Use
chownto change the ownership permission of a file or directory.
- Use
- Group: The group that owns the file or application.
- Use
chgrpto change the group permission of a file or directory.
- Use
- Others: All users with access to the system (outside the users in a group).
- Use
chmodto change the other users' permissions of a file or directory.
- Use
- Owner: The owner of the file or application.
- Task: Change the user permissions of the file and note the changes after running
ls -ltr.
Answer

- Create a simple file and run
-
Writing an Article:
- Write an article about file permissions based on your understanding from the notes.
Answer
-
Understanding File Permissions in Linux
- File permissions in Linux are critical for maintaining security and proper access control. They define who can read, write, and execute a file or directory. Here, we explore the concepts and commands related to file permissions.
-
Basic Permissions
-
Permissions in Linux are represented by a three-digit number, where each digit represents a different set of users: owner, group, and others.
-
Highest Permission:
7(4+2+1) -
Maximum Permission:
777, but effectively666for files due to security reasons, meaning no user gets execute permission. -
Effective Permission for Directories:
755 -
Lowest Permission:
000(not recommended) -
Minimum Effective Permission for Files:
644(default umask value of022) -
Default Directory Permission: Includes execute permission for navigation
-
-
Categories of Users
-
Each of the three permissions are assigned to three defined categories of users:
-
Owner: The owner of the file or application.
- Command:
chownis used to change the ownership of a file or directory.
- Command:
-
Group: The group that owns the file or application.
- Command:
chgrpis used to change the group permission of a file or directory.
- Command:
-
Others: All users with access to the system.
- Command:
chmodis used to change the permissions for other users.
- Command:
-
-
Special Permissions
- SUID (Set User ID): If SUID is set on an executable file and a normal user executes it, the process will have the same rights as the owner of the file being executed instead of the normal user (e.g.,
passwdcommand). - SGID (Set Group ID): If SGID is set on any directory, all subdirectories and files created inside will inherit the group ownership of the main directory, regardless of who creates them.
- Sticky Bit: Used on folders to avoid deletion of a folder and its contents by other users though they have write permissions. Only the owner and root user can delete other users' data in the folder where the sticky bit is set.
- SUID (Set User ID): If SUID is set on an executable file and a normal user executes it, the process will have the same rights as the owner of the file being executed instead of the normal user (e.g.,
-
Access Control Lists (ACL):
- Read about ACL and try out the commands
getfaclandsetfacl. - Task: Create a directory and set specific ACL permissions for different users and groups. Verify the permissions using
getfacl.
Answer

- Read about ACL and try out the commands
-
Additional Tasks:
- Task: Create a script that changes the permissions of multiple files in a directory based on user input.
Answer

- Task: Write a script that sets ACL permissions for a user on a given file, based on user input.
Answer

-
Understanding Sticky Bit, SUID, and SGID:
- Read about sticky bit, SUID, and SGID.
- Sticky bit: Used on directories to prevent users from deleting files they do not own.
- SUID (Set User ID): Allows users to run an executable with the permissions of the executable's owner.
- SGID (Set Group ID): Allows users to run an executable with the permissions of the executable's group.
- Task: Create examples demonstrating the use of sticky bit, SUID, and SGID, and explain their significance.
Answer
- Sticky bit:

- SUID:

- SGID:

- Read about sticky bit, SUID, and SGID.
-
Backup and Restore Permissions:
- Task: Create a script that backs up the current permissions of files in a directory to a file.
Answer

- Task: Create another script that restores the permissions from the backup file.
Answer


In simpler words, a package manager is a tool that allows users to install, remove, upgrade, configure, and manage software packages on an operating system. The package manager can be a graphical application like a software center or a command line tool like apt-get or pacman.
You’ll often find me using the term ‘package’ in tutorials and articles. To understand a package manager, you must understand what a package is.
A package is usually referred to as an application but it could be a GUI application, command line tool, or a software library (required by other software programs). A package is essentially an archive file containing the binary executable, configuration file, and sometimes information about the dependencies.
Package managers differ based on the packaging system but the same packaging system may have more than one package manager.
For example, RPM has Yum and DNF package managers. For DEB, you have apt-get, aptitude command line-based package managers.
-
Install Docker and Jenkins:
- Install Docker and Jenkins on your system from your terminal using package managers.
-
Write a Blog or Article:
- Write a small blog or article on how to install these tools using package managers on Ubuntu and CentOS.
Systemctl is used to examine and control the state of the “systemd” system and service manager. Systemd is a system and service manager for Unix-like operating systems (most distributions, but not all).
-
Check Docker Service Status:
- Check the status of the Docker service on your system (ensure you have completed the installation tasks above).
-
Manage Jenkins Service:
- Stop the Jenkins service and post before and after screenshots.
-
Read About Systemctl vs. Service:
- Read about the differences between the
systemctlandservicecommands. - Example:
systemctl status dockervs.service docker status.
For reference, read this article.
- Read about the differences between the
-
Automate Service Management:
- Write a script to automate the starting and stopping of Docker and Jenkins services.
-
Enable and Disable Services:
- Use systemctl to enable Docker to start on boot and disable Jenkins from starting on boot.
-
Analyze Logs:
- Use journalctl to analyze the logs of the Docker and Jenkins services. Post your findings.
-
Install Docker and Jenkins:
- Install Docker and Jenkins on your system from your terminal using package managers.
Answer
- First-Installing Docker
- Update the package list and install required packages:
   sudo apt update
   sudo apt install apt-transport-https ca-certificates curl software-properties-common
- Add Docker’s official GPG key:
curl -fsSL https://download.docker.com/linux/ubuntu/gpg | sudo apt-key add - - Add the Docker APT repository:
sudo add-apt-repository "deb [arch=amd64] https://download.docker.com/linux/ubuntu $(lsb_release -cs) stable" - Update the package list again:
sudo apt update
- Install Docker:
sudo apt install docker-ce
- Check Docker installation:
sudo systemctl status docker
- Update the package list and install required packages:
- Installing Jenkins
- Add the Jenkins repository key to the system:
curl -fsSL https://pkg.jenkins.io/debian/jenkins.io.key | sudo apt-key add - - Add the Jenkins repository:
sudo sh -c 'echo deb http://pkg.jenkins.io/debian-stable binary/ > /etc/apt/sources.list.d/jenkins.list' - Update the package list:
sudo apt update
- Install Jenkins:
sudo apt install jenkins
- Start Jenkins:
sudo systemctl start jenkins
- Note:
- First, check whether JAVA is installed or not.
java -version
- If you have not installed
sudo apt install default-jre
- First, check whether JAVA is installed or not.
- Add the Jenkins repository key to the system:
Output

Output (Jenkins-UI)

-
Write a Blog or Article:
- Write a small blog or article on how to install these tools using package managers on Ubuntu and CentOS.
Answer
- Introduction:
- Briefly introduce Docker and Jenkins.
- Mention the operating systems (Ubuntu and CentOS) covered.
- Installing Docker on Ubuntu:
- List the steps as detailed above.
- Installing Docker on CentOS:
- Provide similar steps adjusted for CentOS.
- Installing Jenkins on Ubuntu:
- List the steps as detailed above.
- Installing Jenkins on CentOS:
- Provide similar steps adjusted for CentOS.


Systemctl is used to examine and control the state of the “systemd” system and service manager. Systemd is a system and service manager for Unix-like operating systems (most distributions, but not all).
-
Check Docker Service Status:
- Check the status of the Docker service on your system (ensure you have completed the installation tasks above).
Answer

-
Manage Jenkins Service:
- Stop the Jenkins service and post before and after screenshots.
Answer

-
Read About Systemctl vs. Service:
- Read about the differences between the
systemctlandservicecommands. - Example:
systemctl status dockervs.service docker status.
Answer
- Understanding the
systemctlandserviceCommands- Both
systemctlandservicecommands are used to manage system services in Linux, but they differ in terms of usage, functionality, and the system architectures they support. systemctlCommandsystemctlis a command used to introspect and control the state of thesystemdsystem and service manager. It is more modern and is used in systems that usesystemdas their init system, which is common in many contemporary Linux distributions.- Examples:
- Check the status of the Docker service:
sudo systemctl status docker
- Start the Jenkins service:
sudo systemctl start jenkins
- Stop the Docker service:
sudo systemctl stop docker
- Enable the Jenkins service to start at boot:
sudo systemctl enable jenkins
- Check the status of the Docker service:
serviceCommand- 'service' is a command that works with the older 'init' systems (like SysVinit). It provides a way to start, stop, and check the status of services. While it is still available on systems using 'systemd' for backward compatibility, its usage is generally discouraged in favor of 'systemctl'.
- Examples:
- Check the status of the Docker service:
sudo service docker status
- Start the Jenkins service:
sudo service jenkins start
- Stop the Docker service:
sudo service docker stop
- Check the status of the Docker service:
- Key Differences
- 1 System Architecture:
systemctlworks withsystemd.serviceworks with SysVinit and is compatible withsystemdfor backward compatibility.
- 2 Functionality:
systemctloffers more functionality and control over services, including management of the service's state (start, stop, restart, reload), enabling/disabling services at boot, and querying detailed service status.serviceprovides basic functionality for managing services, such as starting, stopping, and checking the status of services.
- 3 Syntax and Usage:
systemctluses a more unified syntax for managing services.servicehas a simpler and more traditional syntax.
- 1 System Architecture:
- Both
- Read about the differences between the


-
Automate Service Management:
- Write a script to automate the starting and stopping of Docker and Jenkins services.
Answer

-
Enable and Disable Services:
- Use systemctl to enable Docker to start on boot and disable Jenkins from starting on boot.
Answer
-
Enable Docker to start on boot:
-
Disable Jenkins from starting on boot:

-
Analyze Logs:
- Use journalctl to analyze the logs of the Docker and Jenkins services. Post your findings.
Answer
-
Docker Logs:

-
Jenkins Logs:


In bash scripts, comments are used to add explanatory notes or disable certain lines of code. Your task is to create a bash script with comments explaining what the script does.
The echo command is used to display messages on the terminal. Your task is to create a bash script that uses echo to print a message of your choice.
Variables in bash are used to store data and can be referenced by their name. Your task is to create a bash script that declares variables and assigns values to them.
Now that you have declared variables, let's use them to perform a simple task. Create a bash script that takes two variables (numbers) as input and prints their sum using those variables.
Bash provides several built-in variables that hold useful information. Your task is to create a bash script that utilizes at least three different built-in variables to display relevant information.
Wildcards are special characters used to perform pattern matching when working with files. Your task is to create a bash script that utilizes wildcards to list all the files with a specific extension in a directory.
- Create a single bash script that completes all the tasks mentioned above.
- Add comments at appropriate places to explain what each part of the script does.
- Ensure that your script is well-documented and easy to understand.
- To submit your entry, create a GitHub repository and commit your script to it.
-
Comments
- In bash scripts, comments are used to add explanatory notes or disable certain lines of code. Your task is to create a bash script with comments explaining what the script does.
Answer

-
Echo
- The echo command is used to display messages on the terminal. Your task is to create a bash script that uses echo to print a message of your choice.
Answer

-
Variables
- Variables in bash are used to store data and can be referenced by their name. Your task is to create a bash script that declares variables and assigns values to them.
Answer

-
Using Variables
- Now that you have declared variables, let's use them to perform a simple task. Create a bash script that takes two variables (numbers) as input and prints their sum using those variables.
Answer

-
Using Built-in Variables
- Bash provides several built-in variables that hold useful information. Your task is to create a bash script that utilizes at least three different built-in variables to display relevant information.
Answer

-
Wildcards
- Wildcards are special characters used to perform pattern matching when working with files. Your task is to create a bash script that utilizes wildcards to list all the files with a specific extension in a directory.
Answer


Your task is to create a bash script that takes a directory path as a command-line argument and performs a backup of the directory. The script should create timestamped backup folders and copy all the files from the specified directory into the backup folder.
Additionally, the script should implement a rotation mechanism to keep only the last 3 backups. This means that if there are more than 3 backup folders, the oldest backup folders should be removed to ensure only the most recent backups are retained.
The script will create a timestamped backup folder inside the specified directory and copy all the files into it. It will also check for existing backup folders and remove the oldest backups to keep only the last 3 backups.
Assume the script is named backup_with_rotation.sh. Here's an example of how it will look,
also assuming the script is executed with the following commands on different dates:
- First Execution (2023-07-30):
$ ./backup_with_rotation.sh /home/user/documents
Output:
Backup created: /home/user/documents/backup_2023-07-30_12-30-45
Backup created: /home/user/documents/backup_2023-07-30_15-20-10
Backup created: /home/user/documents/backup_2023-07-30_18-40-55
After this execution, the /home/user/documents directory will contain the following items:
backup_2023-07-30_12-30-45
backup_2023-07-30_15-20-10
backup_2023-07-30_18-40-55
file1.txt
file2.txt
...
- Second Execution (2023-08-01):
$ ./backup_with_rotation.sh /home/user/documents
Output:
Backup created: /home/user/documents/backup_2023-08-01_09-15-30
After this execution, the /home/user/documents directory will contain the following items:
backup_2023-07-30_15-20-10
backup_2023-07-30_18-40-55
backup_2023-08-01_09-15-30
file1.txt
file2.txt
...
In this example, the script creates backup folders with timestamped names and retains only the last 3 backups while removing the older backups.
Create a bash script named backup_with_rotation.sh that implements the Directory Backup with Rotation as described in the challenge.
Add comments in the script to explain the purpose and logic of each part.
Submit your entry by pushing the script to your GitHub repository.
Congratulations on completing Day 2 of the Bash Scripting Challenge! The challenge focuses on creating a backup script with rotation capabilities to manage multiple backups efficiently. Happy scripting and backing up!
-
Challenge Description
Your task is to create a bash script that takes a directory path as a command-line argument and performs a backup of the directory. The script should create timestamped backup folders and copy all the files from the specified directory into the backup folder.
Additionally, the script should implement a rotation mechanism to keep only the last 3 backups. This means that if there are more than 3 backup folders, the oldest backup folders should be removed to ensure only the most recent backups are retained.
The script will create a timestamped backup folder inside the specified directory and copy all the files into it. It will also check for existing backup folders and remove the oldest backups to keep only the last 3 backups.
Answer
Create a Folder And Make Some File

- Note:
- First, check whether zip is installed or not.
zip
- If you have not installed
sudo apt install zip
- First, check whether zip is installed or not.
Crontab Job Scheduling:

- Auto scheduling through
crontab job scheduling:* 1 * * * bash /root/backup.sh /root/datafile /root/backup
It will take a backup every hour, and the oldest backups will be deleted, leaving only the latest three backups visible:

Bash Script:

Reference
TrainWithShubham - Production Backup Rotation | Shell Scripting For DevOps Engineer - Note:


You are a system administrator responsible for managing a network of servers. Every day, a log file is generated on each server containing important system events and error messages. As part of your daily tasks, you need to analyze these log files, identify specific events, and generate a summary report.
Write a Bash script that automates the process of analyzing log files and generating a daily summary report. The script should perform the following steps:
-
Input: The script should take the path to the log file as a command-line argument.
-
Error Count: Analyze the log file and count the number of error messages. An error message can be identified by a specific keyword (e.g., "ERROR" or "Failed"). Print the total error count.
-
Critical Events: Search for lines containing the keyword "CRITICAL" and print those lines along with the line number.
-
Top Error Messages: Identify the top 5 most common error messages and display them along with their occurrence count.
-
Summary Report: Generate a summary report in a separate text file. The report should include:
- Date of analysis
- Log file name
- Total lines processed
- Total error count
- Top 5 error messages with their occurrence count
- List of critical events with line numbers
-
Optional Enhancement: Add a feature to automatically archive or move processed log files to a designated directory after analysis.
- Use
grep,awk, and other command-line tools to process the log file. - Utilize arrays or associative arrays to keep track of error messages and their counts.
- Use appropriate error handling to handle cases where the log file doesn't exist or other issues arise.
A sample log file named sample_log.log has been provided in the same directory as this challenge file. You can use this file to test your script or use this
- Clone this repository or download the challenge file from the provided link.
- Write your Bash script to complete the log analyzer and report generator task.
- Use the provided
sample_log.logor create your own log files for testing. - Test your script with various log files and scenarios to ensure accuracy.
- Submit your completed script by the end of Day 10 of the 90-day DevOps challenge.
Submit your completed script by creating a pull request or sending the script file to the challenge organizer.
You are a system administrator responsible for managing a network of servers. Every day, a log file is generated on each server containing important system events and error messages. As part of your daily tasks, you need to analyze these log files, identify specific events, and generate a summary report.
Write a Bash script that automates the process of analyzing log files and generating a daily summary report. The script should perform the following steps:
-
Input: The script should take the path to the log file as a command-line argument.
-
Error Count: Analyze the log file and count the number of error messages. An error message can be identified by a specific keyword (e.g., "ERROR" or "Failed"). Print the total error count.
-
Critical Events: Search for lines containing the keyword "CRITICAL" and print those lines along with the line number.
-
Top Error Messages: Identify the top 5 most common error messages and display them along with their occurrence count.
-
Summary Report: Generate a summary report in a separate text file. The report should include:
- Date of analysis
- Log file name
- Total lines processed
- Total error count
- Top 5 error messages with their occurrence count
- List of critical events with line numbers
- First created a folder and then a log file.

- Bash Code for Reference.


-
Optional Enhancement: Add a feature to automatically archive or move processed log files to a designated directory after analysis.


- Use
grep,awk, and other command-line tools to process the log file. - Utilize arrays or associative arrays to keep track of error messages and their counts.
- Use appropriate error handling to handle cases where the log file doesn't exist or other issues arise.
A sample log file named sample_log.log has been provided in the same directory as this challenge file. You can use this file to test your script or use this
Understanding how to handle errors in shell scripts is crucial for creating robust and reliable scripts. Today, you'll learn how to use various techniques to handle errors effectively in your bash scripts.
- Understanding Exit Status: Every command returns an exit status (0 for success and non-zero for failure). Learn how to check and use exit statuses.
- Using
ifStatements for Error Checking: Learn how to useifstatements to handle errors. - Using
trapfor Cleanup: Understand how to use thetrapcommand to handle unexpected errors and perform cleanup. - Redirecting Errors: Learn how to redirect errors to a file or
/dev/null. - Creating Custom Error Messages: Understand how to create meaningful error messages for debugging and user information.
- Write a script that attempts to create a directory and checks if the command was successful. If not, print an error message.
- Modify the script from Task 1 to include more commands (e.g., creating a file inside the directory) and use
ifstatements to handle errors at each step.
- Write a script that creates a temporary file and sets a
trapto delete the file if the script exits unexpectedly.
- Write a script that tries to read a non-existent file and redirects the error message to a file called
error.log.
- Modify one of the previous scripts to include custom error messages that provide more context about what went wrong.
#!/bin/bash
mkdir /tmp/mydir
if [ $? -ne 0 ]; then
  echo "Failed to create directory /tmp/mydir"
fi#!/bin/bash
tempfile=$(mktemp)
trap "rm -f $tempfile" EXIT
echo "This is a temporary file." > $tempfile
cat $tempfile
# Simulate an error
exit 1#!/bin/bash
cat non_existent_file.txt 2> error.log#!/bin/bash
mkdir /tmp/mydir
if [ $? -ne 0 ]; then
echo "Error: Directory /tmp/mydir could not be created. Check if you have the necessary permissions."
fiUnderstanding how to handle errors in shell scripts is crucial for creating robust and reliable scripts. Today, you'll learn how to use various techniques to handle errors effectively in your bash scripts.
- Understanding Exit Status: Every command returns an exit status (0 for success and non-zero for failure). Learn how to check and use exit statuses.
- Using
ifStatements for Error Checking: Learn how to useifstatements to handle errors. - Using
trapfor Cleanup: Understand how to use thetrapcommand to handle unexpected errors and perform cleanup. - Redirecting Errors: Learn how to redirect errors to a file or
/dev/null. - Creating Custom Error Messages: Understand how to create meaningful error messages for debugging and user information.
- Write a script that attempts to create a directory and checks if the command was successful. If not, print an error message.
Answer

- Modify the script from Task 1 to include more commands (e.g., creating a file inside the directory) and use
ifstatements to handle errors at each step.
Answer

- Write a script that creates a temporary file and sets a
trapto delete the file if the script exits unexpectedly.
Answer

- Write a script that tries to read a non-existent file and redirects the error message to a file called
error.log.
Answer

- Modify one of the previous scripts to include custom error messages that provide more context about what went wrong.
Answer

- I also intentionally created an error by not creating the file, so it showed me this error. I did this for reference.

#!/bin/bash
mkdir /tmp/mydir
if [ $? -ne 0 ]; then
  echo "Failed to create directory /tmp/mydir"
fi#!/bin/bash
tempfile=$(mktemp)
trap "rm -f $tempfile" EXIT
echo "This is a temporary file." > $tempfile
cat $tempfile
# Simulate an error
exit 1#!/bin/bash
cat non_existent_file.txt 2> error.log#!/bin/bash
mkdir /tmp/mydir
if [ $? -ne 0 ]; then
echo "Error: Directory /tmp/mydir could not be created. Check if you have the necessary permissions."
fiFind the answers by your understandings (Shouldn't be copied from the internet & use hand-made diagrams) of the questions below and write a blog on it.
- What is Git and why is it important?
- What is the difference between Main Branch and Master Branch?
- Can you explain the difference between Git and GitHub?
- How do you create a new repository on GitHub?
- What is the difference between a local & remote repository? How to connect local to remote?
- Set your user name and email address, which will be associated with your commits.
- Create a repository named "DevOps" on GitHub.
- Connect your local repository to the repository on GitHub.
- Create a new file in Devops/Git/Day-02.txt & add some content to it.
- Push your local commits to the repository on GitHub.
Reference: YouTube Video
Note: These steps assume that you have already installed Git on your computer and have created a GitHub account. If you need help with these prerequisites, you can refer to the guide.
Find the answers by your understandings (Shouldn't be copied from the internet & use hand-made diagrams) of the questions below and write a blog on it.
-
What is Git and why is it important?
- Git is a distributed version control system that allows multiple developers to work on a project simultaneously without overwriting each other's changes. It helps track changes in source code during software development, enabling collaboration, version control, and efficient management of code changes.
Importance of Git:
- Version Control: Keeps track of changes, allowing you to revert to previous versions if needed.
- Collaboration: Multiple developers can work on the same project simultaneously.
- Branching: Allows you to work on different features or fixes in isolation.
- Backup:: Acts as a backup of your codebase.
-
What is the difference between Main Branch and Master Branch?
-
Traditionally, master was the default branch name in Git repositories. However, many communities have moved to using main as the default branch name to be more inclusive and avoid potentially offensive terminology.
-
Main Branch vs. Master Branch:
- Main Branch: The new default branch name used in many modern repositories.
- Master Branch: The traditional default branch name used in older repositories.
The traditional default branch name used in older repositories.
-
-
Can you explain the difference between Git and GitHub?
- Git is a version control system, while GitHub is a web-based platform that uses Git for version control and adds collaboration features like pull requests, issue tracking, and project management.
- Git:
- Command-line tool.
- Manages local repositories.
- GitHub:
- Hosting service for Git repositories.
- Adds collaboration tools and user interfaces.
- Git:
- Git is a version control system, while GitHub is a web-based platform that uses Git for version control and adds collaboration features like pull requests, issue tracking, and project management.
-
How do you create a new repository on GitHub?
- Go to GitHub.
- Click on the + icon in the top right corner.
- Select New repository.
- Enter a repository name (e.g., "DevOps").
- Click Create repository.
-
What is the difference between a local & remote repository? How to connect local to remote?
- Local Repository:
- Stored on your local machine.
- Contains your working directory and Git database.
- Remote Repository:
- Hosted on a server (e.g., GitHub).
- Allows collaboration with other developers.
- Connecting Local to Remote:
- Initialize a local repository:
git init - Add a remote:
git remote add origin <URL>
- Initialize a local repository:
- Local Repository:
- Set your user name and email address, which will be associated with your commits.
Answer

- Create a repository named "DevOps" on GitHub.
Answer

- Connect your local repository to the repository on GitHub.
Answer

- Create a new file in Devops/Git/Day-12.txt & add some content to it.
Answer

- Push your local commits to the repository on GitHub.
Answer

After that if you check it on GitHub then it's output will look like this


Branches are a core concept in Git that allow you to isolate development work without affecting other parts of your repository. Each repository has one default branch, and can have multiple other branches. You can merge a branch into another branch using a pull request.
Branches let you develop features, fix bugs, or safely experiment with new ideas in a contained area of your repository.
Git reset and git revert are two commonly used commands that allow you to remove or edit changes you’ve made in the code in previous commits. Both commands can be very useful in different scenarios.
Git rebase is a command that lets users integrate changes from one branch to another, and the commit history is modified once the action is complete. Git rebase helps keep a clean project history.
Git merge is a command that allows developers to merge Git branches while keeping the logs of commits on branches intact. Even though merging and rebasing do similar things, they handle commit logs differently.
For a better understanding of Git Rebase and Merge, check out this article.
-
Create a Branch and Add a Feature:
- Add a text file called
version01.txtinside theDevops/Git/directory with “This is the first feature of our application” written inside. - Create a new branch from
master.git checkout -b dev
- Commit your changes with a message reflecting the added feature.
git add Devops/Git/version01.txt
git commit -m "Added new feature"
- Add a text file called
-
Push Changes to GitHub:
- Push your local commits to the repository on GitHub.
git push origin dev
- Push your local commits to the repository on GitHub.
-
Add More Features with Separate Commits:
- Update
version01.txtwith the following lines, committing after each change:- 1st line:
This is the bug fix in development branchecho "This is the bug fix in development branch" >> Devops/Git/version01.txt git commit -am "Added feature2 in development branch"
- 2nd line:
This is gadbad codeecho "This is gadbad code" >> Devops/Git/version01.txt git commit -am "Added feature3 in development branch"
- 3rd line:
This feature will gadbad everything from nowecho "This feature will gadbad everything from now" >> Devops/Git/version01.txt git commit -am "Added feature4 in development branch"
- 1st line:
- Update
-
Restore the File to a Previous Version:
- Revert or reset the file to where the content should be “This is the bug fix in development branch”.
git revert HEAD~2
- Revert or reset the file to where the content should be “This is the bug fix in development branch”.
-
Demonstrate Branches:
- Create 2 or more branches and take screenshots to show the branch structure.
-
Merge Changes into Master:
- Make some changes to the
devbranch and merge it intomaster.git checkout master git merge dev
- Make some changes to the
-
Practice Rebase:
- Try rebasing and observe the differences.
git rebase master
- Try rebasing and observe the differences.
Following best practices for branching is important. Check out these best practices that the industry follows.
Simple Reference on branching: video
Advanced Reference on branching: video
Branches are a core concept in Git that allow you to isolate development work without affecting other parts of your repository. Each repository has one default branch, and can have multiple other branches. You can merge a branch into another branch using a pull request.
Branches let you develop features, fix bugs, or safely experiment with new ideas in a contained area of your repository.
Git reset and git revert are two commonly used commands that allow you to remove or edit changes you’ve made in the code in previous commits. Both commands can be very useful in different scenarios.
Git rebase is a command that lets users integrate changes from one branch to another, and the commit history is modified once the action is complete. Git rebase helps keep a clean project history.
Git merge is a command that allows developers to merge Git branches while keeping the logs of commits on branches intact. Even though merging and rebasing do similar things, they handle commit logs differently.
For a better understanding of Git Rebase and Merge, check out this article.
- Create a Branch and Add a Feature:
- Add a text file called
version01.txtinside theDevops/Git/directory with “This is the first feature of our application” written inside.
- Add a text file called
Answer

- Create a new branch from
master.git checkout -b dev
Answer

- Commit your changes with a message reflecting the added feature.
git add Devops/Git/version01.txt
git commit -m "Added new feature"
Answer

- Push Changes to GitHub:
- Push your local commits to the repository on GitHub.
git push origin dev
- Push your local commits to the repository on GitHub.
Answer

- Add More Features with Separate Commits:
- Update
version01.txtwith the following lines, committing after each change:- 1st line:
This is the bug fix in development branchecho "This is the bug fix in development branch" >> Devops/Git/version01.txt git commit -am "Added feature2 in development branch"
- 1st line:
- Update
Answer

- 2nd line:
This is gadbad codeecho "This is gadbad code" >> Devops/Git/version01.txt git commit -am "Added feature3 in development branch"
Answer

- 3rd line:
This feature will gadbad everything from nowecho "This feature will gadbad everything from now" >> Devops/Git/version01.txt git commit -am "Added feature4 in development branch"
Answer

- Restore the File to a Previous Version:
- Revert or reset the file to where the content should be “This is the bug fix in development branch”.
git revert HEAD~2
- Revert or reset the file to where the content should be “This is the bug fix in development branch”.
Answer

This command reverts the last two commits, effectively removing the "gadbad code" and "gadbad everything" lines.
- Demonstrate Branches:
- Create 2 or more branches and take screenshots to show the branch structure.
Answer

- Merge Changes into Master:
- Make some changes to the
devbranch and merge it intomaster.git checkout master git merge dev
- Make some changes to the
Answer

- Screenshot of branch structure:
- To visualize the branch structure, you can use
git logwith graph options or a graphical tool like GitKraken.
- To visualize the branch structure, you can use
Answer

- Practice Rebase:
- Try rebasing and observe the differences.
git rebase master
- Try rebasing and observe the differences.
Answer

- During a rebase, Git re-applies commits from the current branch (in this case, dev) onto the target branch (master). This results in a linear commit history.
You have completed the Linux & Git-GitHub hands-on tasks, and I hope you have learned something interesting from it. 🙌
Now, let's create an interesting 😉 assignment that will not only help you in the future but also benefit the DevOps community!
Let’s make a well-articulated and documented cheat sheet with all the commands you learned so far in Linux and Git-GitHub, along with a brief description of their usage.
Show us your knowledge mixed with your creativity 😎.
- The cheat sheet should be unique and reflect your understanding.
- Include all the important commands you have learned.
- Provide a brief description of each command's usage.
- Make it visually appealing and easy to understand.
For your reference, check out this cheat sheet. However, ensure that your cheat sheet is unique.
You have completed the Linux & Git-GitHub hands-on tasks, and I hope you have learned something interesting from it. 🙌
Now, let's create an interesting 😉 assignment that will not only help you in the future but also benefit the DevOps community!
Let’s make a well-articulated and documented cheat sheet with all the commands you learned so far in Linux and Git-GitHub, along with a brief description of their usage.
Show us your knowledge mixed with your creativity 😎.
- The cheat sheet should be unique and reflect your understanding.
- Include all the important commands you have learned.
- Provide a brief description of each command's usage.
- Make it visually appealing and easy to understand.
ls- Lists files and directories.cd <directory>- Changes the directory.pwd- Prints current directory.mkdir <directory>- Creates a new directory.rm <file>- Removes a file.rm -r <directory>- Removes a directory and its contents.cp <source> <destination>- Copies files or directories.mv <source> <destination>- Moves or renames files or directories.touch <file>- Creates or updates a file.
cat <file>- Displays file content.less <file>- Views file content one screen at a time.nano <file>- Edits files using nano editor.vim <file>- Edits files using vim editor.
uname -a- Displays system information.top- Shows real-time system processes.df -h- Displays disk usage.free -h- Displays memory usage.
chmod <permissions> <file>- Changes file permissions.chown <owner>:<group> <file>- Changes file owner and group.
ping <host>- Sends ICMP echo requests.ifconfig- Displays or configures network interfaces.
git config --global user.name "Your Name"- Sets global user name.git config --global user.email "your.email@example.com"- Sets global user email.
git init- Initializes a new repository.git clone <repository>- Clones a repository.
git status- Shows working tree status.git add <file>- Stages changes.git commit -m "message"- Commits changes.git push- Pushes changes to remote repository.git checkout -b dev- Create a new branch frommaster.git checkout- switch to another branch and check it out into your working directory.git log --oneline --graph --all- visualize the branch structure.git push origin dev- Push Changes to GitHub.git merge dev- merge it intomaster/main.git log- show all commits in the current branch’s history.
For your reference, check out this cheat sheet. However, ensure that your cheat sheet is unique.
Let's start with the basics of Python, as this is also important for DevOps Engineers to build logic and programs.
- Python is an open-source, general-purpose, high-level, and object-oriented programming language.
- It was created by Guido van Rossum.
- Python consists of vast libraries and various frameworks like Django, TensorFlow, Flask, Pandas, Keras, etc.
You can install Python on your system, whether it is Windows, macOS, Ubuntu, CentOS, etc. Below are the links for the installation:
- Windows Installation
- Ubuntu:
apt-get install python3.6
- Install Python on your respective OS, and check the version.
- Read about different data types in Python.
You can get the complete playlist here 🙌
Python is an open-source, general-purpose, high-level, and object-oriented programming language created by Guido van Rossum. It has a vast ecosystem of libraries and frameworks, such as Django, TensorFlow, Flask, Pandas, Keras, and many more.
- Go to the Python website.
- Download the latest version of Python.
- Run the installer and follow the instructions.
- Check the installation by opening a command prompt and typing:
python --version
sudo apt-get updatesudo apt-get install python3.6
- Download the installer from the Python website.
- Follow the installation instructions.
- Check the installation by opening a terminal and typing:
python3 --version
- Install Python on your respective OS, and check the version.
Answer

-
Python supports several data types, which can be categorized as follows:
-
Numeric Types:
-
int: Integer values
x = 10
-
float: Floating-point values
y = 10.5
-
complex: Complex numbers
z = 3 + 5j
-
-
Sequence Types:
-
str: String values
name = "bhavin"
-
list: Ordered collection of items
fruits = ["apple", "banana", "cherry"]
-
tuple: Ordered, immutable collection of items
coordinates = (10.0, 20.0)
-
-
-
Mapping Types:
- dict: Key-value pairs
person = {"name": "bhavin", "age": 24}
- dict: Key-value pairs
-
Set Types:
-
set: Unordered collection of unique items
unique_numbers = {1, 2, 3, 4, 5}
-
frozenset: Immutable set
frozen_numbers = frozenset([1, 2, 3, 4, 5])
-
-
Boolean Type:
- bool: Boolean values
is_active = True
- bool: Boolean values
-
None Type:
- NoneType: Represents the absence of a value
data = None
- NoneType: Represents the absence of a value
You can get the complete playlist here 🙌
Docker is a software platform that allows you to build, test, and deploy applications quickly. Docker packages software into standardized units called containers that have everything the software needs to run, including libraries, system tools, code, and runtime. Using Docker, you can quickly deploy and scale applications into any environment and know your code will run.
As you have already installed Docker in previous tasks, now is the time to run Docker commands.
-
Use the
docker runcommand to start a new container and interact with it through the command line. [Hint:docker run hello-world] -
Use the
docker inspectcommand to view detailed information about a container or image. -
Use the
docker portcommand to list the port mappings for a container. -
Use the
docker statscommand to view resource usage statistics for one or more containers. -
Use the
docker topcommand to view the processes running inside a container. -
Use the
docker savecommand to save an image to a tar archive. -
Use the
docker loadcommand to load an image from a tar archive.
These tasks involve simple operations that can be used to manage images and containers.
Docker is a software platform that allows you to build, test, and deploy applications quickly. Docker packages software into standardized units called containers that have everything the software needs to run, including libraries, system tools, code, and runtime. Using Docker, you can quickly deploy and scale applications into any environment and know your code will run.
As you have already installed Docker in previous tasks, now is the time to run Docker commands.
1. Use the docker run command to start a new container and interact with it through the command line. [Hint: docker run hello-world]
Answer
- This command runs the
hello-worldimage, which prints a message confirming that Docker is working correctly.

Answer
- View Detailed Information About a Container or Image:

Answer
- This command maps port 8181 on the host to port 82 in the container and lists the port mappings.

Answer
- This command provides a live stream of resource usage statistics for all running containers.

Answer
- This command lists the processes running inside the
my_container2container.

Answer
- This command saves the
nginximage to a tar archive namedmy_image.tar.

Answer
- This command loads the image from the
my_image.tararchive into Docker.

These tasks involve simple operations that can be used to manage images and containers.
For reference, you can watch this video: Docker Tutorial on AWS EC2 as DevOps Engineer // DevOps Project Bootcamp Day 2.
You people are doing just amazing in #90daysofdevops. Today's challenge is so special because you are going to do a DevOps project with Docker. Are you excited? 😍
Docker is a tool that makes it easy to run applications in containers. Containers are like small packages that hold everything an application needs to run. To create these containers, developers use something called a Dockerfile.
A Dockerfile is like a set of instructions for making a container. It tells Docker what base image to use, what commands to run, and what files to include. For example, if you were making a container for a website, the Dockerfile might tell Docker to use an official web server image, copy the files for your website into the container, and start the web server when the container starts.
For more about Dockerfile, visit here.
- Create a Dockerfile for a simple web application (e.g. a Node.js or Python app)
- Build the image using the Dockerfile and run the container
- Verify that the application is working as expected by accessing it in a web browser
- Push the image to a public or private repository (e.g. Docker Hub)
For a reference project, visit here.
If you want to dive further, watch this bootcamp.
You people are doing just amazing in #90daysofdevops. Today's challenge is so special because you are going to do a DevOps project with Docker. Are you excited? 😍
Docker is a tool that makes it easy to run applications in containers. Containers are like small packages that hold everything an application needs to run. To create these containers, developers use something called a Dockerfile.
A Dockerfile is like a set of instructions for making a container. It tells Docker what base image to use, what commands to run, and what files to include. For example, if you were making a container for a website, the Dockerfile might tell Docker to use an official web server image, copy the files for your website into the container, and start the web server when the container starts.
For more about Dockerfile, visit here.
1. Create a Dockerfile for a simple web application (e.g. a Node.js or Python app)
-
1. Create a Simple Flask Application
- Create a new directory for your project and navigate into it:
Answer

- Create a new file named
app.pyand add the following content:
Answer

- Create a requirements file named
requirements.txtand add the following content:
Answer

-
2. Create a Dockerfile
- Create a file named
Dockerfilein the same directory and add the following content:
Answer

- Create a file named


2. Build the image using the Dockerfile and run the container
-
To build the Docker image, run the following command in the directory containing the Dockerfile:
Answer

-
Run the Container
- To run the container, use the following command:
Answer


3. Verify that the application is working as expected by accessing it in a web browser
-
Open your web browser and navigate to
http://localhost:5000. You should see the message "Hello, World!".Answer


4. Push the image to a public or private repository (e.g. Docker Hub)
-
To push the image to Docker Hub, you need to tag it with your Docker Hub username and repository name, then push it.
-
1. Tag the Image
Answer

-
2. Push the Image
Answer


Till now you have created a Dockerfile and pushed it to the repository. Let's move forward and dig deeper into other Docker concepts. Today, let's study Docker Compose! 😃
- Docker Compose is a tool that was developed to help define and share multi-container applications.
- With Compose, we can create a YAML file to define the services and, with a single command, spin everything up or tear it all down.
- Learn more about Docker Compose here.
- YAML is a data serialization language that is often used for writing configuration files. Depending on whom you ask, YAML stands for "Yet Another Markup Language" or "YAML Ain’t Markup Language" (a recursive acronym), which emphasizes that YAML is for data, not documents.
- YAML is a popular programming language because it is human-readable and easy to understand.
- YAML files use a .yml or .yaml extension.
- Read more about it here.
Learn how to use the docker-compose.yml file to set up the environment, configure the services and links between different containers, and also to use environment variables in the docker-compose.yml file.
Sample docker-compose.yml file
- Pull a pre-existing Docker image from a public repository (e.g. Docker Hub) and run it on your local machine. Run the container as a non-root user (Hint: Use the
usermodcommand to give the user permission to Docker). Make sure you reboot the instance after giving permission to the user. - Inspect the container's running processes and exposed ports using the
docker inspectcommand. - Use the
docker logscommand to view the container's log output. - Use the
docker stopanddocker startcommands to stop and start the container. - Use the
docker rmcommand to remove the container when you're done.
- Make sure Docker is installed and the system is updated (This was already completed as part of previous tasks):
sudo usermod -a -G docker $USER- Reboot the machine.
For reference, you can watch this video.
Till now you have created a Dockerfile and pushed it to the repository. Let's move forward and dig deeper into other Docker concepts. Today, let's study Docker Compose! 😃
- Docker Compose is a tool that was developed to help define and share multi-container applications.
- With Compose, we can create a YAML file to define the services and, with a single command, spin everything up or tear it all down.
- Learn more about Docker Compose here.
- YAML is a data serialization language that is often used for writing configuration files. Depending on whom you ask, YAML stands for "Yet Another Markup Language" or "YAML Ain’t Markup Language" (a recursive acronym), which emphasizes that YAML is for data, not documents.
- YAML is a popular programming language because it is human-readable and easy to understand.
- YAML files use a .yml or .yaml extension.
- Read more about it here.
Learn how to use the docker-compose.yml file to set up the environment, configure the services and links between different containers, and also to use environment variables in the docker-compose.yml file.
Sample docker-compose.yml file
Answer

-
1. Pull a pre-existing Docker image from a public repository (e.g. Docker Hub) and run it on your local machine. Run the container as a non-root user (Hint: Use the
usermodcommand to give the user permission to Docker). Make sure you reboot the instance after giving permission to the user.- Pull the Docker image:
Answer

- Add the current user to the Docker group:
Answer

- Reboot the machine to apply the changes:
Answer

- Run the Docker container:
Answer

-
2. Inspect the container's running processes and exposed ports using the
docker inspectcommand.- Inspect the container:
Answer

-
3. Use the
docker logscommand to view the container's log output.- View the logs:
Answer

-
4. Use the
docker stopanddocker startcommands to stop and start the container.- Stop the container:
Answer

- Start the container:
Answer

-
5. Use the
docker rmcommand to remove the container when you're done.- Remove the container:
Answer


- Make sure Docker is installed and the system is updated (This was already completed as part of previous tasks):
-
sudo usermod -a -G docker $USERAnswer
-
Reboot the machine.
Answer
-
For reference, you can watch this video.
So far, you've learned how to create a docker-compose.yml file and push it to the repository. Let's move forward and explore more Docker Compose concepts. Today, let's study Docker Volume and Docker Network! 😃
Docker allows you to create volumes, which are like separate storage areas that can be accessed by containers. They enable you to store data, like a database, outside the container, so it doesn't get deleted when the container is removed. You can also mount the same volume to multiple containers, allowing them to share data. For more details, check out this reference.
Docker allows you to create virtual networks, where you can connect multiple containers together. This way, the containers can communicate with each other and with the host machine. Each container has its own storage space, but if we want to share storage between containers, we need to use volumes. For more details, check out this reference.
Create a multi-container docker-compose file that will bring up and bring down containers in a single shot (e.g., create application and database containers).
- Use the
docker-compose upcommand with the-dflag to start a multi-container application in detached mode. - Use the
docker-compose scalecommand to increase or decrease the number of replicas for a specific service. You can also addreplicasin the deployment file for auto-scaling. - Use the
docker-compose pscommand to view the status of all containers, anddocker-compose logsto view the logs of a specific service. - Use the
docker-compose downcommand to stop and remove all containers, networks, and volumes associated with the application.
- Learn how to use Docker Volumes and Named Volumes to share files and directories between multiple containers.
- Create two or more containers that read and write data to the same volume using the
docker run --mountcommand. - Verify that the data is the same in all containers by using the
docker execcommand to run commands inside each container. - Use the
docker volume lscommand to list all volumes and thedocker volume rmcommand to remove the volume when you're done.
You have completed ✅ the Docker hands-on sessions, and I hope you have learned something valuable from it. 🙌
Now it's time to take your Docker skills to the next level by creating a comprehensive cheat-sheet of all the commands you've learned so far. This cheat-sheet should include commands for both Docker and Docker Compose, along with brief explanations of their usage. Not only will this cheat-sheet help you in the future, but it will also serve as a valuable resource for the DevOps community. 😊🙌
So, put your knowledge and creativity to the test and create a cheat-sheet that truly stands out! 🚀
For reference, I have added a cheatsheet. Make sure your cheat-sheet is UNIQUE.
Docker is a crucial topic for DevOps Engineer interviews, especially for freshers. Here are some essential questions to help you prepare and ace your Docker interviews:
- What is the difference between an Image, Container, and Engine?
- What is the difference between the Docker command COPY vs ADD?
- What is the difference between the Docker command CMD vs RUN?
- How will you reduce the size of a Docker image?
- Why and when should you use Docker?
- Explain the Docker components and how they interact with each other.
- Explain the terminology: Docker Compose, Dockerfile, Docker Image, Docker Container.
- In what real scenarios have you used Docker?
- Docker vs Hypervisor?
- What are the advantages and disadvantages of using Docker?
- What is a Docker namespace?
- What is a Docker registry?
- What is an entry point?
- How to implement CI/CD in Docker?
- Will data on the container be lost when the Docker container exits?
- What is a Docker swarm?
- What are the Docker commands for the following:
- Viewing running containers
- Running a container under a specific name
- Exporting a Docker image
- Importing an existing Docker image
- Deleting a container
- Removing all stopped containers, unused networks, build caches, and dangling images?
- What are the common Docker practices to reduce the size of Docker images?
- How do you troubleshoot a Docker container that is not starting?
- Can you explain the Docker networking model?
- How do you manage persistent storage in Docker?
- How do you secure a Docker container?
- What is Docker overlay networking?
- How do you handle environment variables in Docker?
Linux, Git, Git-Hub, Docker finish ho chuka hai to chaliye seekhte hai inko deploy krne ke lye CI-CD tool:
-
Jenkins is an open source continuous integration-continuous delivery and deployment (CI/CD) automation software DevOps tool written in the Java programming language. It is used to implement CI/CD workflows, called pipelines.
-
Jenkins is a tool that is used for automation, and it is an open-source server that allows all the developers to build, test and deploy software. It works or runs on java as it is written in java. By using Jenkins we can make a continuous integration of projects(jobs) or end-to-endpoint automation.
-
Jenkins achieves Continuous Integration with the help of plugins. Plugins allow the integration of Various DevOps stages. If you want to integrate a particular tool, you need to install the plugins for that tool. For example Git, Maven 2 project, Amazon EC2, HTML publisher etc.
Let us do discuss the necessity of this tool before going ahead to the procedural part for installation:
-
Nowadays, humans are becoming lazy😴 day by day so even having digital screens and just one click button in front of us then also need some automation.
-
Here, I’m referring to that part of automation where we need not have to look upon a process(here called a job) for completion and after it doing another job. For that, we have Jenkins with us.
Note: By now Jenkins should be installed on your machine(as it was a part of previous tasks, if not follow Installation Guide)
- what Jenkins is and why it is used. Avoid copying directly from the internet.
- Reflect on how Jenkins integrates into the DevOps lifecycle and its benefits.
- Discuss the role of Jenkins in automating the build, test, and deployment processes.
Create a freestyle pipeline in Jenkins that:
- Prints "Hello World"
- Prints the current date and time
- Clones a GitHub repository and lists its contents
- Configure the pipeline to run periodically (e.g., every hour).
The community is absolutely crushing it in the #90daysofdevops journey. Today's challenge is particularly exciting as it involves creating a Jenkins Freestyle Project, an excellent opportunity for DevOps engineers to showcase their skills and push their limits. Who's ready to dive in and make it happen? 😍
-
CI (Continuous Integration) is the practice of automating the integration of code changes from multiple developers into a single codebase. It involves developers frequently committing their work into a central code repository (such as GitHub or Stash). Automated tools then build the newly committed code and perform tasks like code review, ensuring that the code is integrated smoothly. The key goals of Continuous Integration are to find and address bugs quickly, make the integration process easier across a team of developers, improve software quality, and reduce the time it takes to release new features.
-
CD (Continuous Delivery) follows Continuous Integration and ensures that new changes can be released to customers quickly and without errors. This includes running integration and regression tests in a staging environment (similar to production) to ensure the final release is stable. Continuous Delivery automates the release process, ensuring a release-ready product at all times and allowing deployment at any moment.
A Jenkins build job contains the configuration for automating specific tasks or steps in the application building process. These tasks include gathering dependencies, compiling, archiving, transforming code, testing, and deploying code in different environments.
Jenkins supports several types of build jobs, such as freestyle projects, pipelines, multi-configuration projects, folders, multibranch pipelines, and organization folders.
A freestyle project in Jenkins is a type of project that allows you to build, test, and deploy software using various options and configurations. Here are a few tasks you could complete with a freestyle project in Jenkins:
- Create an agent for your app (which you deployed using Docker in a previous task).
- Create a new Jenkins freestyle project for your app.
- In the "Build" section of the project, add a build step to run the
docker buildcommand to build the image for the container. - Add a second step to run the
docker runcommand to start a container using the image created in the previous step.
- Create a Jenkins project to run the
docker-compose up -dcommand to start multiple containers defined in the compose file (Hint: use the application and database docker-compose file from Day 19). - Set up a cleanup step in the Jenkins project to run the
docker-compose downcommand to stop and remove the containers defined in the compose file.
For reference on Jenkins Freestyle Projects, visit here.
Let's create a comprehensive CI/CD pipeline for your Node.js application! 😍
- Day 23 focused on Jenkins CI/CD, ensuring you understood the basics. Today, you'll take it a step further by completing a full project from start to finish, which you can proudly add to your resume.
- As you've already worked with Docker and Docker Compose, you'll be integrating these tools into a live project.
- Fork this repository.
- Set up a connection between your Jenkins job and your GitHub repository through GitHub Integration.
- Learn about GitHub WebHooks and ensure you have the CI/CD setup configured.
- Refer to this video for a step-by-step guide on the entire project.
- In the "Execute Shell" section of your Jenkins job, run the application using Docker Compose.
- Create a Docker Compose file for this project (a valuable open-source contribution).
- Run the project and celebrate your accomplishment! 🎉
For a detailed walkthrough and hands-on experience with the project, visit this video.
You've been making amazing progress, so let's take a moment to catch up and refine our work. Today's focus is on completing the Jenkins CI/CD project from Day 24 and creating thorough documentation for it.
-
Day 24 provided an end-to-end project experience, and adding this to your resume will be a significant achievement.
-
Take your time to finish the project, create comprehensive documentation, and make sure to highlight it in your resume and share your experience.
-
Document the entire process from cloning the repository to adding webhooks, deployment, and more. Create a detailed README file for your project. You can refer to this example for inspiration.
-
A well-written README file will not only help others understand your project but also make it easier for you to revisit and use the project in the future.
-
As it's a lighter day, set a small goal for yourself. Consider something you've been meaning to accomplish and use this time to focus on it.
-
Share your goal and how you plan to achieve it using this template.
-
Having small, achievable goals and strategies for reaching them is essential. Don't forget to reward yourself for your efforts!
For a detailed walkthrough and project guidance, visit this video.
One of the most important parts of your DevOps and CICD journey is a Declarative Pipeline Syntax of Jenkins
What is Pipeline - A pipeline is a collection of steps or jobs interlinked in a sequence.
Declarative: Declarative is a more recent and advanced implementation of a pipeline as a code.
Scripted: Scripted was the first and most traditional implementation of the pipeline as a code in Jenkins. It was designed as a general-purpose DSL (Domain Specific Language) built with Groovy.
The definition of a Jenkins Pipeline is written into a text file (called a Jenkinsfile) which in turn can be committed to a project’s source control repository.
This is the foundation of "Pipeline-as-code"; treating the CD pipeline as a part of the application to be versioned and reviewed like any other code.
Creating a Jenkinsfile and committing it to source control provides a number of immediate benefits:
- Automatically creates a Pipeline build process for all branches and pull requests.
- Code review/iteration on the Pipeline (along with the remaining source code).
pipeline {
    agent any
    stages {
        stage('Build') {
            steps {
                //
            }
        }
        stage('Test') {
            steps {
                //
            }
        }
        stage('Deploy') {
            steps {
                //
            }
        }
    }
}- Create a New Job, this time select Pipeline instead of Freestyle Project.
- Follow the Official Jenkins Hello world example
- Complete the example using the Declarative pipeline
- In case of any issues feel free to post on any Groups, Discord or Telegram
Day 26 was all about a Declarative pipeline, now its time to level up things, let's integrate Docker and your Jenkins declarative pipeline
docker build - you can use sh 'docker build . -t <tag>' in your pipeline stage block to run the docker build command. (Make sure you have docker installed with correct permissions.
docker run: you can use sh 'docker run -d <image>' in your pipeline stage block to build the container.
How will the stages look
stages {
        stage('Build') {
            steps {
                sh 'docker build -t trainwithshubham/django-app:latest'
            }
        }
}- Create a docker-integrated Jenkins declarative pipeline
- Use the above-given syntax using
shinside the stage block - You will face errors in case of running a job twice, as the docker container will be already created, so for that do task 2
-
Create a docker-integrated Jenkins declarative pipeline using the
dockergroovy syntax inside the stage block. -
You won't face errors, you can Follow this documentation
-
Complete your previous projects using this Declarative pipeline approach
-
In case of any issues feel free to post on any Groups, Discord or Telegram
The Jenkins master server is the central control unit that manages the overall orchestration of workflows defined in pipelines. It handles tasks such as scheduling jobs, monitoring job status, and managing configurations. The master serves the Jenkins UI and acts as the control node, delegating job execution to agents.
A Jenkins agent is a separate machine or container that executes the tasks defined in Jenkins jobs. When a job is triggered on the master, the actual execution occurs on the assigned agent. Each agent is identified by a unique label, allowing the master to delegate jobs to the appropriate agent.
For small teams or projects, a single Jenkins installation may suffice. However, as the number of projects grows, it becomes necessary to scale. Jenkins supports this by allowing a master to connect with multiple agents, enabling distributed job execution.

To set up an agent, you'll need a fresh Ubuntu 22.04 Linux installation. Ensure Java (the same version as on the Jenkins master server) and Docker are installed on the agent machine.
Note: While creating an agent, ensure that permissions, rights, and ownership are appropriately set for Jenkins users.
-
Create an Agent:
- Set up a new node in Jenkins by creating an agent.
-
AWS EC2 Instance Setup:
- Create a new AWS EC2 instance and connect it to the master (where Jenkins is installed).
-
Master-Agent Connection:
- Establish a connection between the master and agent using SSH and a public-private key pair exchange.
- Verify the agent's status in the "Nodes" section.
You can follow this article for detailed instructions.
-
Run Previous Jobs on the New Agent:
- Use the agent to run the Jenkins jobs you built on Day 26 and Day 27.
-
Labeling:
- Assign labels to the agent and configure your master server to trigger builds on the appropriate agent based on these labels.

Here are some Jenkins-specific questions related to Docker and other DevOps concepts that can be useful during a DevOps Engineer interview:
- What’s the difference between continuous integration, continuous delivery, and continuous deployment?
- Benefits of CI/CD.
- What is meant by CI-CD?
- What is Jenkins Pipeline?
- How do you configure a job in Jenkins?
- Where do you find errors in Jenkins?
- In Jenkins, how can you find log files?
- Jenkins workflow and write a script for this workflow?
- How to create continuous deployment in Jenkins?
- How to build a job in Jenkins?
- Why do we use pipelines in Jenkins?
- Is Jenkins alone sufficient for automation?
- How will you handle secrets in Jenkins?
- Explain the different stages in a CI-CD setup.
- Name some of the plugins in Jenkins.
- You have a Jenkins pipeline that deploys to a staging environment. Suddenly, the deployment failed due to a missing configuration file. How would you troubleshoot and resolve this issue?
- Imagine you have a Jenkins job that is taking significantly longer to complete than expected. What steps would you take to identify and mitigate the issue?
- You need to implement a secure method to manage environment-specific secrets for different stages (development, staging, production) in your Jenkins pipeline. How would you approach this?
- Suppose your Jenkins master node is under heavy load and build times are increasing. What strategies can you use to distribute the load and ensure efficient build processing?
- A developer commits a code change that breaks the build. How would you set up Jenkins to automatically handle such scenarios and notify the relevant team members?
- You are tasked with setting up a Jenkins pipeline for a multi-branch project. How would you handle different configurations and build steps for different branches?
- How would you implement a rollback strategy in a Jenkins pipeline to revert to a previous stable version if the deployment fails?
- In a scenario where you have multiple teams working on different projects, how would you structure Jenkins jobs and pipelines to ensure efficient resource utilization and manage permissions?
- Your Jenkins agents are running in a cloud environment, and you notice that build times fluctuate due to varying resource availability. How would you optimize the performance and cost of these agents?

With the widespread adoption of containers among organizations, Kubernetes, the container-centric management software, has become a standard to deploy and operate containerized applications and is one of the most important parts of DevOps.
Originally developed at Google and released as open-source in 2014. Kubernetes builds on 15 years of running Google's containerized workloads and the valuable contributions from the open-source community. Inspired by Google’s internal cluster management system, Borg,
-
What is Kubernetes? Write in your own words and why do we call it k8s?
-
What are the benefits of using k8s?
-
Explain the architecture of Kubernetes, refer to this video
-
What is Control Plane?
-
Write the difference between kubectl and kubelets.
-
Explain the role of the API server.
Kubernetes architecture is important, so make sure you spend a day understanding it. This video will surely help you.
Awesome! You learned the architecture of one of the top most important tool "Kubernetes" in your previous task.
Let's read about minikube and implement k8s in our local machine
- What is minikube?
Ans:- Minikube is a tool which quickly sets up a local Kubernetes cluster on macOS, Linux, and Windows. It can deploy as a VM, a container, or on bare-metal.
Minikube is a pared-down version of Kubernetes that gives you all the benefits of Kubernetes with a lot less effort.
This makes it an interesting option for users who are new to containers, and also for projects in the world of edge computing and the Internet of Things.
- Features of minikube
Ans :-
(a) Supports the latest Kubernetes release (+6 previous minor versions)
(b) Cross-platform (Linux, macOS, Windows)
(c) Deploy as a VM, a container, or on bare-metal
(d) Multiple container runtimes (CRI-O, containerd, docker)
(e) Direct API endpoint for blazing fast image load and build
(f) Advanced features such as LoadBalancer, filesystem mounts, FeatureGates, and network policy
(g) Addons for easily installed Kubernetes applications
(h) Supports common CI environments
For installation, you can Visit this page.
If you want to try an alternative way, you can check this.
Ans:-
Pods are the smallest deployable units of computing that you can create and manage in Kubernetes.
A Pod (as in a pod of whales or pea pod) is a group of one or more containers, with shared storage and network resources, and a specification for how to run the containers. A Pod's contents are always co-located and co-scheduled, and run in a shared context. A Pod models an application-specific "logical host": it contains one or more application containers which are relatively tightly coupled.
You can read more about pod from here .
We are suggesting you make an nginx pod, but you can always show your creativity and do it on your own.
Having an issue? Don't worry, adding a sample yaml file for pod creation, you can always refer that.
A Deployment provides a configuration for updates for Pods and ReplicaSets.
You describe a desired state in a Deployment, and the Deployment Controller changes the actual state to the desired state at a controlled rate. You can define Deployments to create new replicas for scaling, or to remove existing Deployments and adopt all their resources with new Deployments.
Create one Deployment file to deploy a sample todo-app on K8s using "Auto-healing" and "Auto-Scaling" feature
- add a deployment.yml file (sample is kept in the folder for your reference)
- apply the deployment to your k8s (minikube) cluster by command
kubectl apply -f deployment.yml
Let's make your resume shine with one more project ;)
Having an issue? Don't worry, adding a sample deployment file , you can always refer that or wathch this video
In Kubernetes, Namespaces are used to create isolated environments for resources. Each Namespace is like a separate cluster within the same physical cluster. Services are used to expose your Pods and Deployments to the network. Read more about Namespace Here
-
Create a Namespace for your Deployment
-
Use the command
kubectl create namespace <namespace-name>to create a Namespace -
Update the deployment.yml file to include the Namespace
-
Apply the updated deployment using the command:
kubectl apply -f deployment.yml -n <namespace-name> -
Verify that the Namespace has been created by checking the status of the Namespaces in your cluster.
- Read about Services, Load Balancing, and Networking in Kubernetes. Refer official documentation of kubernetes Link
Need help with Namespaces? Check out this video for assistance.
In Kubernetes, Services are objects that provide stable network identities to Pods and abstract away the details of Pod IP addresses. Services allow Pods to receive traffic from other Pods, Services, and external clients.
- Create a Service for your todo-app Deployment from Day-32
- Create a Service definition for your todo-app Deployment in a YAML file.
- Apply the Service definition to your K8s (minikube) cluster using the
kubectl apply -f service.yml -n <namespace-name>command. - Verify that the Service is working by accessing the todo-app using the Service's IP and Port in your Namespace.
- Create a ClusterIP Service for accessing the todo-app from within the cluster
- Create a ClusterIP Service definition for your todo-app Deployment in a YAML file.
- Apply the ClusterIP Service definition to your K8s (minikube) cluster using the
kubectl apply -f cluster-ip-service.yml -n <namespace-name>command. - Verify that the ClusterIP Service is working by accessing the todo-app from another Pod in the cluster in your Namespace.
- Create a LoadBalancer Service for accessing the todo-app from outside the cluster
- Create a LoadBalancer Service definition for your todo-app Deployment in a YAML file.
- Apply the LoadBalancer Service definition to your K8s (minikube) cluster using the
kubectl apply -f load-balancer-service.yml -n <namespace-name>command. - Verify that the LoadBalancer Service is working by accessing the todo-app from outside the cluster in your Namespace.
Struggling with Services? Take a look at this video for a step-by-step guide.
Need help with Services in Kubernetes? Check out the Kubernetes documentation for assistance.
In Kubernetes, ConfigMaps and Secrets are used to store configuration data and secrets, respectively. ConfigMaps store configuration data as key-value pairs, while Secrets store sensitive data in an encrypted form.
- Example :- Imagine you're in charge of a big spaceship (Kubernetes cluster) with lots of different parts (containers) that need information to function properly. ConfigMaps are like a file cabinet where you store all the information each part needs in simple, labeled folders (key-value pairs). Secrets, on the other hand, are like a safe where you keep the important, sensitive information that shouldn't be accessible to just anyone (encrypted data). So, using ConfigMaps and Secrets, you can ensure each part of your spaceship (Kubernetes cluster) has the information it needs to work properly and keep sensitive information secure! 🚀
- Read more about ConfigMap & Secret.
- Create a ConfigMap for your Deployment
- Create a ConfigMap for your Deployment using a file or the command line
- Update the deployment.yml file to include the ConfigMap
- Apply the updated deployment using the command:
kubectl apply -f deployment.yml -n <namespace-name> - Verify that the ConfigMap has been created by checking the status of the ConfigMaps in your Namespace.
- Create a Secret for your Deployment
- Create a Secret for your Deployment using a file or the command line
- Update the deployment.yml file to include the Secret
- Apply the updated deployment using the command:
kubectl apply -f deployment.yml -n <namespace-name> - Verify that the Secret has been created by checking the status of the Secrets in your Namespace.
Need help with ConfigMaps and Secrets? Check out this video for assistance.
🙌 Kudos to you for conquering ConfigMaps and Secrets in Kubernetes yesterday.
🔥 You're on fire! 🔥
In Kubernetes, a Persistent Volume (PV) is a piece of storage in the cluster that has been provisioned by an administrator. A Persistent Volume Claim (PVC) is a request for storage by a user. The PVC references the PV, and the PV is bound to a specific node. Read official documentation of Persistent Volumes.
⏰ Wait, wait, wait! 📣 Attention all #90daysofDevOps Challengers. 💪
Before diving into today's task, don't forget to share your thoughts on the #90daysofDevOps challenge 💪 Fill out our feedback form (https://lnkd.in/gcgvrq8b) to help us improve and provide the best experience 🌟 Your participation and support is greatly appreciated 🙏 Let's continue to grow together 🌱
Add a Persistent Volume to your Deployment todo app.
-
Create a Persistent Volume using a file on your node. Template
-
Create a Persistent Volume Claim that references the Persistent Volume. Template
-
Update your deployment.yml file to include the Persistent Volume Claim. After Applying pv.yml pvc.yml your deployment file look like this Template
-
Apply the updated deployment using the command:
kubectl apply -f deployment.yml -
Verify that the Persistent Volume has been added to your Deployment by checking the status of the Pods and Persistent Volumes in your cluster. Use this commands
kubectl get pods,
kubectl get pv
Accessing data in the Persistent Volume,
- Connect to a Pod in your Deployment using command : `kubectl exec -it -- /bin/bash
`
- Verify that you can access the data stored in the Persistent Volume from within the Pod
Need help with Persistent Volumes? Check out this video for assistance.
Keep up the excellent work🙌💥
1.What is Kubernetes and why it is important?
2.What is difference between docker swarm and kubernetes?
3.How does Kubernetes handle network communication between containers?
4.How does Kubernetes handle scaling of applications?
5.What is a Kubernetes Deployment and how does it differ from a ReplicaSet?
6.Can you explain the concept of rolling updates in Kubernetes?
7.How does Kubernetes handle network security and access control?
8.Can you give an example of how Kubernetes can be used to deploy a highly available application?
9.What is namespace is kubernetes? Which namespace any pod takes if we don't specify any namespace?
10.How ingress helps in kubernetes?
11.Explain different types of services in kubernetes?
12.Can you explain the concept of self-healing in Kubernetes and give examples of how it works?
13.How does Kubernetes handle storage management for containers?
14.How does the NodePort service work?
15.What is a multinode cluster and single-node cluster in Kubernetes?
16.Difference between create and apply in kubernetes?

Congratulations!!!! you have come so far. Don't let your excuses break your consistency. Let's begin our new Journey with Cloud☁. By this time you have created multiple EC2 instances, if not let's begin the journey:
Amazon Web Services is one of the most popular Cloud Provider that has free tier too for students and Cloud enthutiasts for their Handson while learning (Create your free account today to explore more on it).
Read from here
AWS Identity and Access Management (IAM) is a web service that helps you securely control access to AWS resources. With IAM, you can centrally manage permissions that control which AWS resources users can access. You use IAM to control who is authenticated (signed in) and authorized (has permissions) to use resources. Read from here
Get to know IAM more deeply Click Here!!
Create an IAM user with username of your own wish and grant EC2 Access. Launch your Linux instance through the IAM user that you created now and install jenkins and docker on your machine via single Shell Script.
In this task you need to prepare a devops team of avengers. Create 3 IAM users of avengers and assign them in devops groups with IAM policy.

By this time you have created multiple EC2 instances, and post installation manually installed applications like Jenkins, docker etc. Now let's switch to little automation part. Sounds interesting??🤯
Amazon Web Services is one of the most popular Cloud Provider that has free tier too for students and Cloud enthutiasts for their Handson while learning (Create your free account today to explore more on it).
Read from here
- When you launch an instance in Amazon EC2, you have the option of passing user data to the instance that can be used to perform common automated configuration tasks and even run scripts after the instance starts. You can pass two types of user data to Amazon EC2: shell scripts and cloud-init directives.
- You can also pass this data into the launch instance wizard as plain text, as a file (this is useful for launching instances using the command line tools), or as base64-encoded text (for API calls).
- This will save time and manual effort everytime you launch an instance and want to install any application on it like apache, docker, Jenkins etc
Read more from here
AWS Identity and Access Management (IAM) is a web service that helps you securely control access to AWS resources. With IAM, you can centrally manage permissions that control which AWS resources users can access. You use IAM to control who is authenticated (signed in) and authorized (has permissions) to use resources. Read from here
Get to know IAM more deeply🏊Click Here!!
- Launch EC2 instance with already installed Jenkins on it. Once server shows up in console, hit the IP address in browser and you Jenkins page should be visible.
- Take screenshot of Userdata and Jenkins page, this will verify the task completion.
- Read more on IAM Roles and explain the IAM Users, Groups and Roles in your own terms.
- Create three Roles named: DevOps-User, Test-User and Admin.
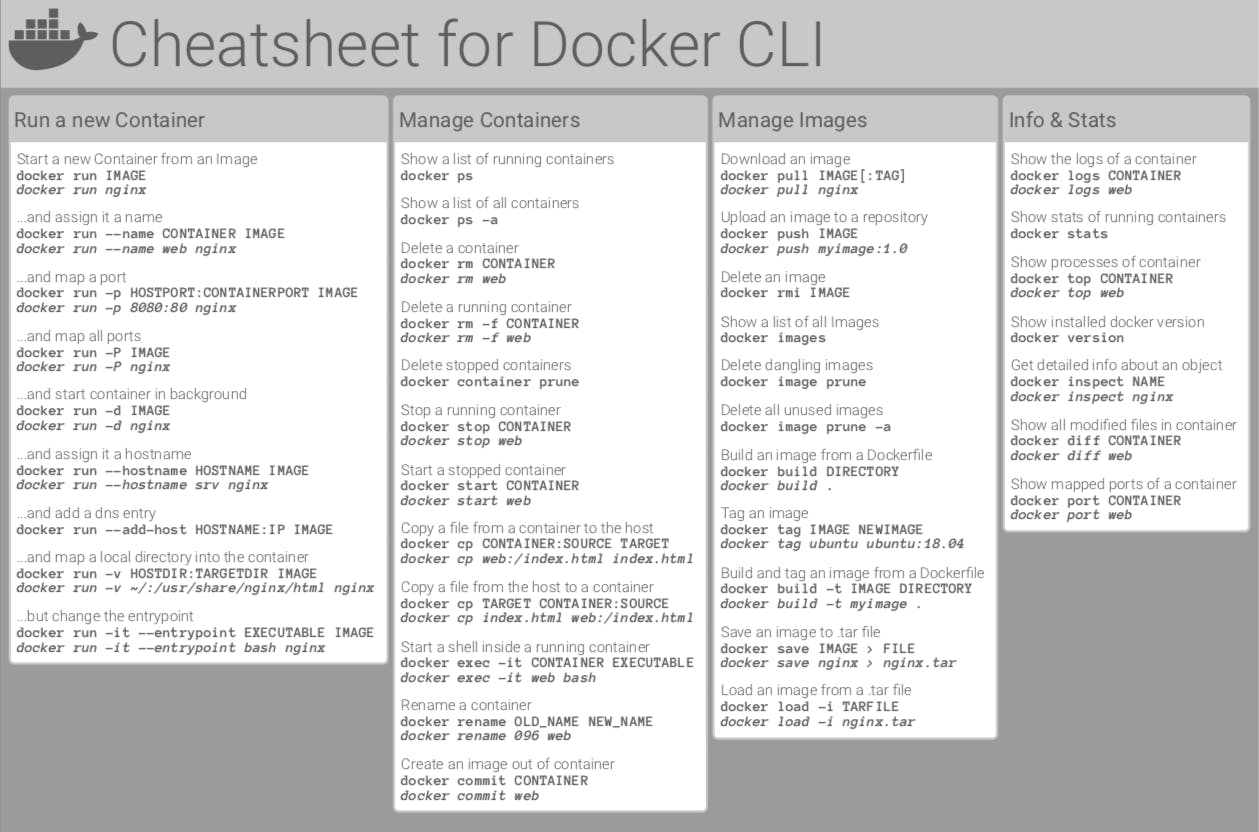
I hope your journey with AWS cloud and automation is going well
Amazon EC2 or Amazon Elastic Compute Cloud can give you secure, reliable, high-performance, and cost-effective computing infrastructure to meet demanding business needs.
Also, if you know a few things, you can automate many things.
Read from here
- You can make a launch template with the configuration information you need to start an instance. You can save launch parameters in launch templates so you don't have to type them in every time you start a new instance.
- For example, a launch template can have the AMI ID, instance type, and network settings that you usually use to launch instances.
- You can tell the Amazon EC2 console to use a certain launch template when you start an instance.
Read more from here
Amazon EC2 has a large number of instance types that are optimised for different uses. The different combinations of CPU, memory, storage and networking capacity in instance types give you the freedom to choose the right mix of resources for your apps. Each instance type comes with one or more instance sizes, so you can adjust your resources to meet the needs of the workload you want to run.
Read from here
An Amazon Machine Image (AMI) is an image that AWS supports and keeps up to date. It contains the information needed to start an instance. When you launch an instance, you must choose an AMI. When you need multiple instances with the same configuration, you can launch them from a single AMI.
-
Create a launch template with Amazon Linux 2 AMI and t2.micro instance type with Jenkins and Docker setup (You can use the Day 39 User data script for installing the required tools.
-
Create 3 Instances using Launch Template, there must be an option that shows number of instances to be launched ,can you find it? :)
-
You can go one step ahead and create an auto-scaling group, sounds tough?
Check this out

Hi, I hope you had a great day yesterday learning about the launch template and instances in EC2. Today, we are going to dive into one of the most important concepts in EC2: Load Balancing.
Load balancing is the distribution of workloads across multiple servers to ensure consistent and optimal resource utilization. It is an essential aspect of any large-scale and scalable computing system, as it helps you to improve the reliability and performance of your applications.
Elastic Load Balancing (ELB) is a service provided by Amazon Web Services (AWS) that automatically distributes incoming traffic across multiple EC2 instances. ELB provides three types of load balancers:
Read more from here
- Application Load Balancer (ALB) - operates at layer 7 of the OSI model and is ideal for applications that require advanced routing and microservices.
- Read more from here
- Network Load Balancer (NLB) - operates at layer 4 of the OSI model and is ideal for applications that require high throughput and low latency.
- Read more from here
- Classic Load Balancer (CLB) - operates at layer 4 of the OSI model and is ideal for applications that require basic load balancing features.
- Read more here
- launch 2 EC2 instances with an Ubuntu AMI and use User Data to install the Apache Web Server.
- Modify the index.html file to include your name so that when your Apache server is hosted, it will display your name also do it for 2nd instance which include " TrainWithShubham Community is Super Aweasome :) ".
- Copy the public IP address of your EC2 instances.
- Open a web browser and paste the public IP address into the address bar.
- You should see a webpage displaying information about your PHP installation.
- Create an Application Load Balancer (ALB) in EC2 using the AWS Management Console.
- Add EC2 instances which you launch in task-1 to the ALB as target groups.
- Verify that the ALB is working properly by checking the health status of the target instances and testing the load balancing capabilities.

Need help with task? Check out this Blog for assistance.
Today is more of a reading excercise and getting some programmatic access for your AWS account
In order to access your AWS account from a terminal or system, you can use AWS Access keys and AWS Secret Access keys Watch this video for more details.
The AWS Command Line Interface (AWS CLI) is a unified tool to manage your AWS services. With just one tool to download and configure, you can control multiple AWS services from the command line and automate them through scripts.
The AWS CLI v2 offers several new features including improved installers, new configuration options such as AWS IAM Identity Center (successor to AWS SSO), and various interactive features.
- Create AWS_ACCESS_KEY_ID and AWS_SECRET_ACCESS_KEY from AWS Console.
- Setup and install AWS CLI and configure your account credentials
Let me know if you have any issues while doing the task.
Hi, I hope you had a great day yesterday. Today as part of the #90DaysofDevOps Challenge we will be exploring most commonly used service in AWS i.e S3.

Amazon Simple Storage Service (Amazon S3) is an object storage service that provides a secure and scalable way to store and access data on the cloud. It is designed for storing any kind of data, such as text files, images, videos, backups, and more. Read more here
- Launch an EC2 instance using the AWS Management Console and connect to it using Secure Shell (SSH).
- Create an S3 bucket and upload a file to it using the AWS Management Console.
- Access the file from the EC2 instance using the AWS Command Line Interface (AWS CLI).
Read more about S3 using aws-cli here
- Create a snapshot of the EC2 instance and use it to launch a new EC2 instance.
- Download a file from the S3 bucket using the AWS CLI.
- Verify that the contents of the file are the same on both EC2 instances.
Added Some Useful commands to complete the task. Click here for commands
Let me know if you have any questions or face any issues while doing the tasks.🚀
Here are some commonly used AWS CLI commands for Amazon S3:
aws s3 ls - This command lists all of the S3 buckets in your AWS account.
aws s3 mb s3://bucket-name - This command creates a new S3 bucket with the specified name.
aws s3 rb s3://bucket-name - This command deletes the specified S3 bucket.
aws s3 cp file.txt s3://bucket-name - This command uploads a file to an S3 bucket.
aws s3 cp s3://bucket-name/file.txt . - This command downloads a file from an S3 bucket to your local file system.
aws s3 sync local-folder s3://bucket-name - This command syncs the contents of a local folder with an S3 bucket.
aws s3 ls s3://bucket-name - This command lists the objects in an S3 bucket.
aws s3 rm s3://bucket-name/file.txt - This command deletes an object from an S3 bucket.
aws s3 presign s3://bucket-name/file.txt - This command generates a pre-signed URL for an S3 object, which can be used to grant temporary access to the object.
aws s3api list-buckets - This command retrieves a list of all S3 buckets in your AWS account, using the S3 API.
Amazon Relational Database Service (Amazon RDS) is a collection of managed services that makes it simple to set up, operate, and scale databases in the cloud
- Create a Free tier RDS instance of MySQL
- Create an EC2 instance
- Create an IAM role with RDS access
- Assign the role to EC2 so that your EC2 Instance can connect with RDS
- Once the RDS instance is up and running, get the credentials and connect your EC2 instance using a MySQL client.
Hint:
You should install mysql client on EC2, and connect the Host and Port of RDS with this client.
Post the screenshots once your EC2 instance can connect a MySQL server, that will be a small win for you.
Watch this video for reference.
Over 30% of all websites on the internet use WordPress as their content management system (CMS). It is most often used to run blogs, but it can also be used to run e-commerce sites, message boards, and many other popular things. This guide will show you how to set up a WordPress blog site.
- As WordPress requires a MySQL database to store its data ,create an RDS as you did in Day 44
To configure this WordPress site, you will create the following resources in AWS:
- An Amazon EC2 instance to install and host the WordPress application.
- An Amazon RDS for MySQL database to store your WordPress data.
- Setup the server and post your new Wordpress app.
Read this for a detailed explanation
Hey learners, you have been using aws services atleast for last 45 days. Have you ever wondered what happen if for any service is charging you bill continously and you don't know till you loose all your pocket money ?
Hahahaha😁, Well! we, as a responsible community ,always try to make it under free tier , but it's good to know and setup something , which will inform you whenever bill touches a Threshold.
Amazon CloudWatch monitors your Amazon Web Services (AWS) resources and the applications you run on AWS in real time. You can use CloudWatch to collect and track metrics, which are variables you can measure for your resources and applications.
Read more about cloudwatch from the official documentation here
Amazon Simple Notification Service is a notification service provided as part of Amazon Web Services since 2010. It provides a low-cost infrastructure for mass delivery of messages, predominantly to mobile users.
Read more about it here
- Create a CloudWatch alarm that monitors your billing and send an email to you when a it reaches $2.
(You can keep it for your future use)
- Delete your billing Alarm that you created now.
(Now you also know how to delete as well. )
Need help with Cloudwatch? Check out this official documentation for assistance.
Today, we explore the new AWS service- Elastic Beanstalk. We'll also cover deploying a small web application (game) on this platform

- AWS Elastic Beanstalk is a service used to deploy and scale web applications developed by developers.
- It supports multiple programming languages and runtime environments such as Java, .NET, PHP, Node.js, Python, Ruby, Go, and Docker.
- Previously, developers faced challenges in sharing software modules across geographically separated teams.
- AWS Elastic Beanstalk solves this problem by providing a service to easily share applications across different devices.
- Highly scalable
- Fast and simple to begin
- Quick deployment
- Supports multi-tenant architecture
- Simplifies operations
- Cost efficient
- Application Version: Represents a specific iteration or release of an application's codebase.
- Environment Tier: Defines the infrastructure resources allocated for an environment (e.g., web server environment, worker environment).
- Environment: Represents a collection of AWS resources running an application version.
- Configuration Template: Defines the settings for an environment, including instance types, scaling options, and more.
There are two types of environments: web server and worker.
-
Web server environments are front-end facing, accessed directly by clients using a URL.
-
Worker environments support backend applications or micro apps.
Deploy the 2048-game using the AWS Elastic Beanstalk.
If you ever find yourself facing a challenge, feel free to refer to this helpful blog post for guidance and support.
Today, we will be test the aws knowledge on services in AWS, as part of the 90 Days of DevOps Challenge.
- Launch an EC2 instance using the AWS Management Console and connect to it using SSH.
- Install a web server on the EC2 instance and deploy a simple web application.
- Monitor the EC2 instance using Amazon CloudWatch and troubleshoot any issues that arise.
- Create an Auto Scaling group using the AWS Management Console and configure it to launch EC2 instances in response to changes in demand.
- Use Amazon CloudWatch to monitor the performance of the Auto Scaling group and the EC2 instances and troubleshoot any issues that arise.
- Use the AWS CLI to view the state of the Auto Scaling group and the EC2 instances and verify that the correct number of instances are running.
We hope that these tasks will give you hands-on experience with aws services and help you understand how these services work together. If you have any questions or face any issues while doing the tasks, please let us know.
Today will be a great learning for sure. I know many of you may not know about the term "ECS". As you know, 90 Days Of DevOps Challenge is mostly about 'learning new' , let's learn then ;)
- ECS (Elastic Container Service) is a fully-managed container orchestration service provided by Amazon Web Services (AWS). It allows you to run and manage Docker containers on a cluster of virtual machines (EC2 instances) without having to manage the underlying infrastructure.
With ECS, you can easily deploy, manage, and scale your containerized applications using the AWS Management Console, the AWS CLI, or the API. ECS supports both "Fargate" and "EC2 launch types", which means you can run your containers on AWS-managed infrastructure or your own EC2 instances.
ECS also integrates with other AWS services, such as Elastic Load Balancing, Auto Scaling, and Amazon VPC, allowing you to build scalable and highly available applications. Additionally, ECS has support for Docker Compose and Kubernetes, making it easy to adopt existing container workflows.
Overall, ECS is a powerful and flexible container orchestration service that can help simplify the deployment and management of containerized applications in AWS.
- EKS (Elastic Kubernetes Service) and ECS (Elastic Container Service) are both container orchestration platforms provided by Amazon Web Services (AWS). While both platforms allow you to run containerized applications in the AWS cloud, there are some differences between the two.
Architecture: ECS is based on a centralized architecture, where there is a control plane that manages the scheduling of containers on EC2 instances. On the other hand, EKS is based on a distributed architecture, where the Kubernetes control plane is distributed across multiple EC2 instances.
Kubernetes Support: EKS is a fully managed Kubernetes service, meaning that it supports Kubernetes natively and allows you to run your Kubernetes workloads on AWS without having to manage the Kubernetes control plane. ECS, on the other hand, has its own orchestration engine and does not support Kubernetes natively.
Scaling: EKS is designed to automatically scale your Kubernetes cluster based on demand, whereas ECS requires you to configure scaling policies for your tasks and services.
Flexibility: EKS provides more flexibility than ECS in terms of container orchestration, as it allows you to customize and configure Kubernetes to meet your specific requirements. ECS is more restrictive in terms of the options available for container orchestration.
Community: Kubernetes has a large and active open-source community, which means that EKS benefits from a wide range of community-driven development and support. ECS, on the other hand, has a smaller community and is largely driven by AWS itself.
In summary, EKS is a good choice if you want to use Kubernetes to manage your containerized workloads on AWS, while ECS is a good choice if you want a simpler, more managed platform for running your containerized applications.
Set up ECS (Elastic Container Service) by setting up Nginx on ECS.
Hey people, we have listened to your suggestions and we are looking forward to get more! As you people have asked to put more interview based questions as part of Daily Task, So here it it :)
- Name 5 aws services you have used and what's the use cases?
- What are the tools used to send logs to the cloud environment?
- What are IAM Roles? How do you create /manage them?
- How to upgrade or downgrade a system with zero downtime?
- What is infrastructure as code and how do you use it?
- What is a load balancer? Give scenarios of each kind of balancer based on your experience.
- What is CloudFormation and why is it used for?
- Difference between AWS CloudFormation and AWS Elastic Beanstalk?
- What are the kinds of security attacks that can occur on the cloud? And how can we minimize them?
- Can we recover the EC2 instance when we have lost the key?
- What is a gateway?
- What is the difference between the Amazon Rds, Dynamodb, and Redshift?
- Do you prefer to host a website on S3? What's the reason if your answer is either yes or no?
What if I tell you, in next 4 days, you'll be making a CI/CD pipeline on AWS with these tools.
- CodeCommit
- CodeBuild
- CodeDeploy
- CodePipeline
- S3
- CodeCommit is a managed source control service by AWS that allows users to store, manage, and version their source code and artifacts securely and at scale. It supports Git, integrates with other AWS services, enables collaboration through branch and merge workflows, and provides audit logs and compliance reports to meet regulatory requirements and track changes. Overall, CodeCommit provides developers with a reliable and efficient way to manage their codebase and set up a CI/CD pipeline for their software development projects.
- Set up a code repository on CodeCommit and clone it on your local.
- You need to setup GitCredentials in your AWS IAM.
- Use those credentials in your local and then clone the repository from CodeCommit
- Add a new file from local and commit to your local branch
- Push the local changes to CodeCommit repository.
For more details watch this video.
On your journey of making a CI/CD pipeline on AWS with these tools, you completed AWS CodeCommit.
Next few days you'll learn these tools/services:
- CodeBuild
- CodeDeploy
- CodePipeline
- S3
- AWS CodeBuild is a fully managed build service in the cloud. CodeBuild compiles your source code, runs unit tests, and produces artifacts that are ready to deploy. CodeBuild eliminates the need to provision, manage, and scale your own build servers.
- Read about Buildspec file for Codebuild.
- create a simple index.html file in CodeCommit Repository
- you have to build the index.html using nginx server
- Add buildspec.yaml file to CodeCommit Repository and complete the build process.
For more details watch this video.
On your journey of making a CI/CD pipeline on AWS with these tools, you completed AWS CodeCommit & CodeBuild.
Next few days you'll learn these tools/services:
- CodeDeploy
- CodePipeline
- S3
- AWS CodeDeploy is a deployment service that automates application deployments to Amazon EC2 instances, on-premises instances, serverless Lambda functions, or Amazon ECS services.
CodeDeploy can deploy application content that runs on a server and is stored in Amazon S3 buckets, GitHub repositories, or Bitbucket repositories. CodeDeploy can also deploy a serverless Lambda function. You do not need to make changes to your existing code before you can use CodeDeploy.
- Read about Appspec.yaml file for CodeDeploy.
- Deploy index.html file on EC2 machine using nginx
- you have to setup a CodeDeploy agent in order to deploy code on EC2
- Add appspec.yaml file to CodeCommit Repository and complete the deployment process.
For more details watch this video.
On your journey of making a CI/CD pipeline on AWS with these tools, you completed AWS CodeCommit, CodeBuild & CodeDeploy.
Finish Off in style with AWS CodePipeline
- CodePipeline builds, tests, and deploys your code every time there is a code change, based on the release process models you define. Think of it as a CI/CD Pipeline service
- Create a Deployment group of Ec2 Instance.
- Create a CodePipeline that gets the code from CodeCommit, Builds the code using CodeBuild and deploys it to a Deployment Group.
For more details watch this video.
When it comes to the cloud, Infrastructure as Code (IaC) and Configuration Management (CM) are inseparable. With IaC, a descriptive model is used for infrastructure management. To name a few examples of infrastructure: networks, virtual computers, and load balancers. Using an IaC model always results in the same setting.
Throughout the lifecycle of a product, Configuration Management (CM) ensures that the performance, functional and physical inputs, requirements, design, and operations of that product remain consistent.
- Read more about IaC and Config. Management Tools
- Give differences on both with suitable examples
- What are most commont IaC and Config management Tools?
Ansible is an open-source automation tool, or platform, used for IT tasks such as configuration management, application deployment, intraservice orchestration, and provisioning
- Installation of Ansible on AWS EC2 (Master Node)
sudo apt-add-repository ppa:ansible/ansiblesudo apt updatesudo apt install ansible
- read more about Hosts file
sudo nano /etc/ansible/hosts ansible-inventory --list -y
- Setup 2 more EC2 instances with same Private keys as the previous instance (Node)
- Copy the private key to master server where Ansible is setup
- Try a ping command using ansible to the Nodes.
Ansible ad hoc commands are one-liners designed to achieve a very specific task they are like quick snippets and your compact swiss army knife when you want to do a quick task across multiple machines.
To put simply, Ansible ad hoc commands are one-liner Linux shell commands and playbooks are like a shell script, a collective of many commands with logic.
Ansible ad hoc commands come handy when you want to perform a quick task.
-
write an ansible ad hoc ping command to ping 3 servers from inventory file
-
Write an ansible ad hoc command to check uptime
-
You can refer to this blog to understand the different examples of ad-hoc commands and try out them, post the screenshots in a blog with an explanation.
Ansible is fun, you saw in last few days how easy it is.
Let's make it fun now, by using a video explanation for Ansible.
- Write a Blog explanation for the ansible video
Ansible playbooks run multiple tasks, assign roles, and define configurations, deployment steps, and variables. If you’re using multiple servers, Ansible playbooks organize the steps between the assembled machines or servers and get them organized and running in the way the users need them to. Consider playbooks as the equivalent of instruction manuals.
-
Write an ansible playbook to create a file on a different server
-
Write an ansible playbook to create a new user.
-
Write an ansible playbook to install docker on a group of servers
Watch this video to learn about ansible Playbooks
- Write a blog about writing ansible playbooks with the best practices.
Let me or anyone in the community know if you face any challenges
Ansible playbooks are amazing, as you learned yesterday. What if you deploy a simple web app using ansible, sounds like a good project, right?
-
create 3 EC2 instances . make sure all three are created with same key pair
-
Install Ansible in host server
-
copy the private key from local to Host server (Ansible_host) at (/home/ubuntu/.ssh)
-
access the inventory file using sudo vim /etc/ansible/hosts
-
Create a playbook to install Nginx
-
deploy a sample webpage using the ansible playbook
Read this Blog by Sandeep Singh to clear all your doubts
Let me or anyone in the community know if you face any challenges
Hello Learners , you guys are doing every task by creating an ec2 instance (mostly). Today let’s automate this process . How to do it ? Well Terraform is the solution .
Terraform is an infrastructure as code (IaC) tool that allows you to create, manage, and update infrastructure resources such as virtual machines, networks, and storage in a repeatable, scalable, and automated way.
Install Terraform on your system Refer this link for installation
- Why we use terraform?
- What is Infrastructure as Code (IaC)?
- What is Resource?
- What is Provider?
- Whats is State file in terraform? What’s the importance of it ?
- What is Desired and Current State?
You can prepare for tomorrow's task from here🚀🚀
We Hope this tasks will help you understand how to write a basic Terraform configuration file and basic commands on Terraform.
Hope you've already got the gist of What Working with Terraform would be like . Lets begin with day 2 of Terraform !
find purpose of basic Terraform commands which you'll use often
-
terraform init -
terraform init -upgrade -
terraform plan -
terraform apply -
terraform validate -
terraform fmt -
terraform destroy
Also along with these tasks its important to know about Terraform in general- Who are Terraform's main competitors? The main competitors are:
Ansible Packer Cloud Foundry Kubernetes
Want a Free video Course for terraform? Click here
Terraform needs to be told which provider to be used in the automation, hence we need to give the provider name with source and version. For Docker, we can use this block of code in your main.tf
- Create a Terraform script with Blocks and Resources
terraform {
  required_providers {
    docker = {
      source  = "kreuzwerker/docker"
      version = "~> 2.21.0"
}
}
}
The provider block configures the specified provider, in this case, docker. A provider is a plugin that Terraform uses to create and manage your resources.
provider "docker" {}
Use resource blocks to define components of your infrastructure. A resource might be a physical or virtual component such as a Docker container, or it can be a logical resource such as a Heroku application.
Resource blocks have two strings before the block: the resource type and the resource name. In this example, the first resource type is docker_image and the name is Nginx.
- Create a resource Block for an nginx docker image
Hint:
resource "docker_image" "nginx" {
 name         = "nginx:latest"
 keep_locally = false
}
- Create a resource Block for running a docker container for nginx
resource "docker_container" "nginx" {
 image = docker_image.nginx.latest
 name  = "tutorial"
 ports {
   internal = 80
   external = 80
 }
}
Note: In case Docker is not installed
sudo apt-get install docker.io
sudo docker ps
sudo chown $USER /var/run/docker.sock
I can imagine, Terraform can be tricky, so best to use a Free video Course for terraform here
variables in Terraform are quite important, as you need to hold values of names of instance, configs , etc.
We can create a variables.tf file which will hold all the variables.
variable "filename" {
default = "/home/ubuntu/terrform-tutorials/terraform-variables/demo-var.txt"
}
variable "content" {
default = "This is coming from a variable which was updated"
}
These variables can be accessed by var object in main.tf
- Create a local file using Terraform Hint:
resource "local_file" "devops" {
filename = var.filename
content = var.content
}
variable "file_contents" {
type = map
default = {
"statement1" = "this is cool"
"statement2" = "this is cooler"
}
}
- Use terraform to demonstrate usage of List, Set and Object datatypes
- Put proper screenshots of the outputs
Use terraform refresh
To refresh the state by your configuration file, reloads the variables
I can imagine, Terraform can be tricky, so best to use a Free video Course for terraform here
Provisioning on AWS is quite easy and straightforward with Terraform.
The AWS Command Line Interface (AWS CLI) is a unified tool to manage your AWS services. With just one tool to download and configure, you can control multiple AWS services from the command line and automate them through scripts.
IAM (Identity Access Management) AWS Identity and Access Management (IAM) is a web service that helps you securely control access to AWS resources. You use IAM to control who is authenticated (signed in) and authorized (has permissions) to use resources.
In order to connect your AWS account and Terraform, you need the access keys and secret access keys exported to your machine.
export AWS_ACCESS_KEY_ID=<access key>
export AWS_SECRET_ACCESS_KEY=<secret access key>
terraform {
 required_providers {
        aws = {
        source  = "hashicorp/aws"
        version = "~> 4.16"
}
}
        required_version = ">= 1.2.0"
}
Add the region where you want your instances to be
provider "aws" {
region = "us-east-1"
}
- Provision an AWS EC2 instance using Terraform
Hint:
resource "aws_instance" "aws_ec2_test" {
        count = 4
        ami = "ami-08c40ec9ead489470"
        instance_type = "t2.micro"
        tags = {
     Name = "TerraformTestServerInstance"
  }
}
I can imagine, Terraform can be tricky, so best to use a Free video Course for terraform here
Yesterday, we saw how to create a Terraform script with Blocks and Resources. Today, we will dive deeper into Terraform resources.
A resource in Terraform represents a component of your infrastructure, such as a physical server, a virtual machine, a DNS record, or an S3 bucket. Resources have attributes that define their properties and behaviors, such as the size and location of a virtual machine or the domain name of a DNS record.
When you define a resource in Terraform, you specify the type of resource, a unique name for the resource, and the attributes that define the resource. Terraform uses the resource block to define resources in your Terraform configuration.
To allow traffic to the EC2 instance, you need to create a security group. Follow these steps:
In your main.tf file, add the following code to create a security group:
resource "aws_security_group" "web_server" {
  name_prefix = "web-server-sg"

  ingress {
    from_port   = 80
    to_port     = 80
    protocol    = "tcp"
    cidr_blocks = ["0.0.0.0/0"]
  }
}
-
Run terraform init to initialize the Terraform project.
-
Run terraform apply to create the security group.
-
Now you can create an EC2 instance with Terraform. Follow these steps:
-
In your main.tf file, add the following code to create an EC2 instance:
resource "aws_instance" "web_server" {
  ami           = "ami-0557a15b87f6559cf"
  instance_type = "t2.micro"
  key_name      = "my-key-pair"
  security_groups = [
    aws_security_group.web_server.name
  ]

  user_data = <<-EOF
              #!/bin/bash
              echo "<html><body><h1>Welcome to my website!</h1></body></html>" > index.html
              nohup python -m SimpleHTTPServer 80 &
              EOF
}
Note: Replace the ami and key_name values with your own. You can find a list of available AMIs in the AWS documentation.
Run terraform apply to create the EC2 instance.
- Now that your EC2 instance is up and running, you can access the website you just hosted on it. Follow these steps:
Day 66 - Terraform Hands-on Project - Build Your Own AWS Infrastructure with Ease using Infrastructure as Code (IaC) Techniques(Interview Questions) ☁️
Welcome back to your Terraform journey.
In the previous tasks, you have learned about the basics of Terraform, its configuration file, and creating an EC2 instance using Terraform. Today, we will explore more about Terraform and create multiple resources.
- Create a VPC (Virtual Private Cloud) with CIDR block 10.0.0.0/16
- Create a public subnet with CIDR block 10.0.1.0/24 in the above VPC.
- Create a private subnet with CIDR block 10.0.2.0/24 in the above VPC.
- Create an Internet Gateway (IGW) and attach it to the VPC.
- Create a route table for the public subnet and associate it with the public subnet. This route table should have a route to the Internet Gateway.
- Launch an EC2 instance in the public subnet with the following details:
- AMI: ami-0557a15b87f6559cf
- Instance type: t2.micro
- Security group: Allow SSH access from anywhere
- User data: Use a shell script to install Apache and host a simple website
- Create an Elastic IP and associate it with the EC2 instance.
- Open the website URL in a browser to verify that the website is hosted successfully.
This Terraform hands-on task is designed to test your proficiency in using Terraform for Infrastructure as Code (IaC) on AWS. You will be tasked with creating a VPC, subnets, an internet gateway, and launching an EC2 instance with a web server running on it. This task will showcase your skills in automating infrastructure deployment using Terraform. It's a popular interview question for companies looking for candidates with hands-on experience in Terraform. That's it for today.
Amazon S3 (Simple Storage Service) is an object storage service that offers industry-leading scalability, data availability, security, and performance. It can be used for a variety of use cases, such as storing and retrieving data, hosting static websites, and more.
In this task, you will learn how to create and manage S3 buckets in AWS.
- Create an S3 bucket using Terraform.
- Configure the bucket to allow public read access.
- Create an S3 bucket policy that allows read-only access to a specific IAM user or role.
- Enable versioning on the S3 bucket.
Yesterday, we learned how to AWS S3 Bucket with Terraform. Today, we will see how to scale our infrastructure with Terraform.
Scaling is the process of adding or removing resources to match the changing demands of your application. As your application grows, you will need to add more resources to handle the increased load. And as the load decreases, you can remove the extra resources to save costs.
Terraform makes it easy to scale your infrastructure by providing a declarative way to define your resources. You can define the number of resources you need and Terraform will automatically create or destroy the resources as needed.
Auto Scaling Groups are used to automatically add or remove EC2 instances based on the current demand. Follow these steps to create an Auto Scaling Group:
- In your main.tf file, add the following code to create an Auto Scaling Group:
resource "aws_launch_configuration" "web_server_as" {
  image_id        = "ami-005f9685cb30f234b"
  instance_type  = "t2.micro"
  security_groups = [aws_security_group.web_server.name]

  user_data = <<-EOF
              #!/bin/bash
              echo "<html><body><h1>You're doing really Great</h1></body></html>" > index.html
              nohup python -m SimpleHTTPServer 80 &
              EOF
}

resource "aws_autoscaling_group" "web_server_asg" {
  name                 = "web-server-asg"
  launch_configuration = aws_launch_configuration.web_server_lc.name
  min_size             = 1
  max_size             = 3
  desired_capacity     = 2
  health_check_type    = "EC2"
  load_balancers       = [aws_elb.web_server_lb.name]
  vpc_zone_identifier  = [aws_subnet.public_subnet_1a.id, aws_subnet.public_subnet_1b.id]
}
- Run terraform apply to create the Auto Scaling Group.
-
Go to the AWS Management Console and select the Auto Scaling Groups service.
-
Select the Auto Scaling Group you just created and click on the "Edit" button.
-
Increase the "Desired Capacity" to 3 and click on the "Save" button.
-
Wait a few minutes for the new instances to be launched.
-
Go to the EC2 Instances service and verify that the new instances have been launched.
-
Decrease the "Desired Capacity" to 1 and wait a few minutes for the extra instances to be terminated.
-
Go to the EC2 Instances service and verify that the extra instances have been terminated.
Congratulations🎊🎉 You have successfully scaled your infrastructure with Terraform.
When you define a resource block in Terraform, by default, this specifies one resource that will be created. To manage several of the same resources, you can use either count or for_each, which removes the need to write a separate block of code for each one. Using these options reduces overhead and makes your code neater.
count is what is known as a ‘meta-argument’ defined by the Terraform language. Meta-arguments help achieve certain requirements within the resource block.
The count meta-argument accepts a whole number and creates the number of instances of the resource specified.
When each instance is created, it has its own distinct infrastructure object associated with it, so each can be managed separately. When the configuration is applied, each object can be created, destroyed, or updated as appropriate.
eg.
terraform {

required_providers {

aws = {

source = "hashicorp/aws"

version = "~> 4.16"

}

}

required_version = ">= 1.2.0"

}


provider "aws" {

region = "us-east-1"

}


resource "aws_instance" "server" {

count = 4


ami = "ami-08c40ec9ead489470"

instance_type = "t2.micro"


tags = {

Name = "Server ${count.index}"

}

}
Like the count argument, the for_each meta-argument creates multiple instances of a module or resource block. However, instead of specifying the number of resources, the for_each meta-argument accepts a map or a set of strings. This is useful when multiple resources are required that have different values. Consider our Active directory groups example, with each group requiring a different owner.
terraform {

required_providers {

aws = {

source = "hashicorp/aws"

version = "~> 4.16"

}

}

required_version = ">= 1.2.0"

}


provider "aws" {

region = "us-east-1"

}


locals {

ami_ids = toset([

"ami-0b0dcb5067f052a63",

"ami-08c40ec9ead489470",

])

}


resource "aws_instance" "server" {

for_each = local.ami_ids


ami = each.key

instance_type = "t2.micro"

tags = {

Name = "Server ${each.key}"

}

}


Multiple key value iteration

locals {

ami_ids = {

"linux" :"ami-0b0dcb5067f052a63",

"ubuntu": "ami-08c40ec9ead489470",

}

}


resource "aws_instance" "server" {

for_each = local.ami_ids


ami = each.value

instance_type = "t2.micro"


tags = {

Name = "Server ${each.key}"

}

}
- Create the above Infrastructure as code and demonstrate the use of Count and for_each.
- Write about meta-arguments and its use in Terraform.
- Modules are containers for multiple resources that are used together. A module consists of a collection of .tf and/or .tf.json files kept together in a directory
- A module can call other modules, which lets you include the child module's resources into the configuration in a concise way.
- Modules can also be called multiple times, either within the same configuration or in separate configurations, allowing resource configurations to be packaged and re-used.
# Creating a AWS EC2 Instance
resource "aws_instance" "server-instance" {
  # Define number of instance
  instance_count = var.number_of_instances

  # Instance Configuration
  ami                    = var.ami
  instance_type          = var.instance_type
  subnet_id              = var.subnet_id
  vpc_security_group_ids = var.security_group

  # Instance Tagsid
  tags = {
    Name = "${var.instance_name}"
  }
}
# Server Module Variables
variable "number_of_instances" {
  description = "Number of Instances to Create"
  type        = number
  default     = 1
}

variable "instance_name" {
  description = "Instance Name"
}

variable "ami" {
  description = "AMI ID"
  default     = "ami-xxxx"
}

variable "instance_type" {
  description = "Instance Type"
}

variable "subnet_id" {
  description = "Subnet ID"
}

variable "security_group" {
  description = "Security Group"
  type        = list(any)
}
# Server Module Output
output "server_id" {
  description = "Server ID"
  value       = aws_instance.server-instance.id
}
Explain the below in your own words and it shouldnt be copied from Internet 😉
- Write about different modules Terraform.
- Difference between Root Module and Child Module.
- Is modules and Namespaces are same? Justify your answer for both Yes/No
You all are doing great, and you have come so far. Well Done Everyone🎉
4. You have a Terraform configuration file that defines an infrastructure deployment. However, there are multiple instances of the same resource that need to be created. How would you modify the configuration file to achieve this?
5. You want to know from which paths Terraform is loading providers referenced in your Terraform configuration (*.tf files). You need to enable debug messages to find this out. Which of the following would achieve this?
A. Set the environment variable TF_LOG=TRACE
B. Set verbose logging for each provider in your Terraform configuration
C. Set the environment variable TF_VAR_log=TRACE
D. Set the environment variable TF_LOG_PATH
6. Below command will destroy everything that is being created in the infrastructure. Tell us how would you save any particular resource while destroying the complete infrastructure.
terraform destroy
9. You are working on a Terraform project that needs to provision an S3 bucket, and a user with read and write access to the bucket. What resources would you use to accomplish this, and how would you configure them?
Day 72 - Grafana🔥
Hello Learners , you guys are doing really a good job. You will not be there 24*7 to monitor your resources. So, Today let’s monitor the resources in a smart way with - Grafana 🎉
What is Grafana? What are the features of Grafana? Why Grafana? What type of monitoring can be done via Grafana? What databases work with Grafana? What are metrics and visualizations in Grafana? What is the difference between Grafana vs Prometheus?
Day 73 - Grafana 🔥 Hope you are now clear with the basics of grafana, like why we use, where we use, what can we do with this and so on.
Now, let's do some practical stuff.
Task:
Setup grafana in your local environment on AWS EC2.
You guys did amazing job last day setting up Grafana on Local 🔥.
Now, let's do one step ahead.
Task:
Connect an Linux and one Windows EC2 instance with Grafana and monitor the different components of the server.
We have monitored ,😉 that you guys are understanding and doing amazing with monitoring tool. 👌
Today, make it little bit more complex but interesting 😍 and let's add one more Project 🔥 to your resume.
- Install Docker and start docker service on a Linux EC2 through USER DATA .
- Create 2 Docker containers and run any basic application on those containers (A simple todo app will work).
- Now intregrate the docker containers and share the real time logs with Grafana (Your Instance should be connected to Grafana and Docker plugin should be enabled on grafana).
- Check the logs or docker container name on Grafana UI.
You can use this video for your refernce. But it's always better to find your own way of doing. 😊
- As you have done this amazing task, here is one bonus link.❤️
You can use this refernce video to intregrate Prometheus with Grafana and monitor Docker containers. Seems interesting ?
A dashboard gives you an at-a-glance view of your data and lets you track metrics through different visualizations.
Dashboards consist of panels, each representing a part of the story you want your dashboard to tell.
Every panel consists of a query and a visualization. The query defines what data you want to display, whereas the visualization defines how the data is displayed.
-
In the sidebar, hover your cursor over the Create (plus sign) icon and then click Dashboard.
-
Click Add a new panel.
-
In the Query editor below the graph, enter the query from earlier and then press Shift + Enter:
sum(rate(tns_request_duration_seconds_count[5m])) by(route)
-
In the Legend field, enter {{route}} to rename the time series in the legend. The graph legend updates when you click outside the field.
-
In the Panel editor on the right, under Settings, change the panel title to “Traffic”.
-
Click Apply in the top-right corner to save the panel and go back to the dashboard view.
-
Click the Save dashboard (disk) icon at the top of the dashboard to save your dashboard.
-
Enter a name in the Dashboard name field and then click Save.
Read this in case you have any questions
Do share some amazing Dashboards with the community
Grafana Alerting allows you to learn about problems in your systems moments after they occur. Create, manage, and take action on your alerts in a single, consolidated view, and improve your team’s ability to identify and resolve issues quickly.
Grafana Alerting is available for Grafana OSS, Grafana Enterprise, or Grafana Cloud. With Mimir and Loki alert rules you can run alert expressions closer to your data and at massive scale, all managed by the Grafana UI you are already familiar with.
- Setup Grafana cloud
- Setup sample alerting
Check out this blog for more details
Day - 78 (Grafana Cloud)
Task - 01
- Setup alerts for EC2 instance.
- Setup alerts for AWS Billing Alerts.
Day 79 - Prometheus 🔥
Now, the next step is to learn about the Prometheus. It's an open-source system for monitoring services and alerts based on a time series data model. Prometheus collects data and metrics from different services and stores them according to a unique identifier—the metric name—and a time stamp.
Tasks:
- What is the Architecture of Prometheus Monitoring?
- What are the Features of Prometheus?
- What are the Components of Prometheus?
- What database is used by Prometheus?
- What is the default data retention period in Prometheus?
Ref: https://www.devopsschool.com/blog/top-50-prometheus-interview-questions-and-answers/
=========
The project aims to automate the building, testing, and deployment process of a web application using Jenkins and GitHub. The Jenkins pipeline will be triggered automatically by GitHub webhook integration when changes are made to the code repository. The pipeline will include stages such as building, testing, and deploying the application, with notifications and alerts for failed builds or deployments.
Do the hands-on Project, read this
=========
The project is about automating the deployment process of a web application using Jenkins and its declarative syntax. The pipeline includes stages like building, testing, and deploying to a staging environment. It also includes running acceptance tests and deploying to production if all tests pass.
Do the hands-on Project, read this
=========
The project involves hosting a static website using an AWS S3 bucket. Amazon S3 is an object storage service that provides a simple web services interface to store and retrieve any amount of data. The website files will be uploaded to an S3 bucket and configured to function as a static website. The bucket will be configured with the appropriate permissions and a unique domain name, making the website publicly accessible. Overall, the project aims to leverage the benefits of AWS S3 to host and scale a static website in a cost-effective and scalable manner.
Do the hands-on Project, read this
=========
The project aims to deploy a web application using Docker Swarm, a container orchestration tool that allows for easy management and scaling of containerized applications. The project will utilize Docker Swarm's production-ready features such as load balancing, rolling updates, and service discovery to ensure high availability and reliability of the web application. The project will involve creating a Dockerfile to package the application into a container and then deploying it onto a Swarm cluster. The Swarm cluster will be configured to provide automated failover, load balancing, and horizontal scaling to the application. The goal of the project is to demonstrate the benefits of Docker Swarm for deploying and managing containerized applications in production environments.
Do the hands-on Project, read this
=========
The project involves deploying a Netflix clone web application on a Kubernetes cluster, a popular container orchestration platform that simplifies the deployment and management of containerized applications. The project will require creating Docker images of the web application and its dependencies and deploying them onto the Kubernetes cluster using Kubernetes manifests. The Kubernetes cluster will provide benefits such as high availability, scalability, and automatic failover of the application. Additionally, the project will utilize Kubernetes tools such as Kubernetes Dashboard and kubectl to monitor and manage the deployed application. Overall, the project aims to demonstrate the power and benefits of Kubernetes for deploying and managing containerized applications at scale.
Get a netflix clone form GitHub, read this and follow the Redit clone steps to similarly deploy a Netflix Clone
=========
The project involves deploying a Node JS app on AWS ECS Fargate and AWS ECR. Read More about the tech stack here
-
Get a NodeJs application from GitHub.
-
Build the Dockerfile present in the repo
-
Setup AWS CLI and AWS Login in order to tag and push to ECR
-
Setup an ECS cluster
-
Create a Task Definition for the node js project with ECR image
-
Run the Project
=========
The project involves deploying a Portfolio app on AWS S3 using GitHub Actions. Git Hub actions allows you to perform CICD with GitHub Repository integrated.
-
Get a Portfolio application from GitHub.
-
Build the GitHub Actions Workflow
-
Setup AWS CLI and AWS Login in order to sync website to S3 (to be done as a part of YAML)
-
Follow this video to understand it better
-
Run the Project
=========
The project involves deploying a react application on AWS Elastic BeanStalk using GitHub Actions. Git Hub actions allows you to perform CICD with GitHub Repository integrated.
-
Get source code from GitHub.
-
Setup AWS Elastic BeanStalk
-
Build the GitHub Actions Workflow
-
Follow this blog to understand it better
-
Run the Project
=========
The project involves deploying a Django Todo app on AWS EC2 using Kubeadm Kubernetes cluster.
Kubernetes Cluster helps in Auto-scaling and Auto-healing of your application.
-
Get a Django Full Stack application from GitHub.
-
Setup the Kubernetes cluster using this script
-
Setup Deployment and Service for Kubernetes.
-
Run the Project
=========
The project involves Mounting of AWS S3 Bucket On Amazon EC2 Linux Using S3FS.
This is a AWS Mini Project that will teach you AWS, S3, EC2, S3FS.
- Create IAM user and set policies for the project resources using this blog.
- Utilize and make the best use of aws-cli
- Run the Project